When is the Best Time to Insulate Your Attic?

When is the Best Time to Insulate Your Attic?

When it comes to making your home more comfortable and energy-efficient, one crucial aspect often overlooked is attic insulation. I really don't know why people just ignore attic insulation but let me tell you that, attic insulation is not only a smart investment but it can also save you money on energy bills.

So, let's see when is the best time to insulate your attic? Let's explore the ideal seasons and why they matter in this journey towards a cozier, cost-effective home

Understanding Attic Insulation

Before we dive into the best time for attic insulation, it's essential to understand the role of insulation in your attic. Attic insulation primarily serves two main purposes:

  1. Temperature Control: Attic insulation helps regulate the temperature in your home. In winter it doesn't let the warmth of your house escape and similarly in summers the outer heat doesn't enter inside the house. In this way, it controls the temperature.

  2. Energy Efficiency: Proper attic insulation can lead to significant energy savings. It reduces the heat loss in the winter and heat gain in the summer, that reduces the figures on your utility bills.

Now that we have a basic understanding of why attic insulation is crucial let's delve into the best time to get it done.

Best Time to Insulate Your Attic

Now let's come to the big question- When is the best time to insulate the attic? Well, you can insulate your attic whenever you want but if will ask the best time then it's the fall or spring because your attic is less likely to be damp during these seasons, which makes the insulation job easier.

Here's why these times are best:

1. Nice Weather:

Fall and spring have pleasant weather. It's not too hot or too cold, so you won't be uncomfortable while working.

2. Less Humidity:

Your attic is usually less humid in the fall and spring. High humidity can make insulation work harder and even lead to mold problems.

3. Fewer Bugs:

Bugs and pests are less active in these seasons, so you won't have as many unwanted guests while you're insulating.

4. Easier Scheduling:

Insulation professionals are usually less busy in the fall and spring, so it's easier to find a convenient appointment time.

Looking to save on your energy bill, Can Installing a Smart Thermostat Save You Money?

Benefits of Proper Attic Insulation

Now let's look at some of most important benefits that comes with attic insulation.

1. Energy Savings

Proper attic insulation can lead to significant energy savings. Because a proper insulation ensures that heat doesn't escape out from your home in winters and in summer it doesn't enter inside your home. So, in this way your heating and cooling system work normally and hence cuts down your electricity bill.

2. Improved Comfort

A well-insulated attic keeps your home comfortable year-round. You won't experience extreme temperature fluctuations, which means no more freezing winters or sweltering summers indoors.

3. Reduced Environmental Impact

This I think is the most important benefit of attic insulation. Although it doesn't seems contributing much to the environment but trust me it does. It significantly reduces the carbon footprints from the environment.

4. Increased Home Value

Proper attic insulation can increase the overall value of your home. It's an attractive feature for potential buyers, and it can make your property more appealing on the real estate market.

You may also like to explore Metal Roofing vs. Shingle Roofing - Which Material should You Use?

Types of Attic Insulation

You have many options to choose but here are the most common types:

1. Fiberglass Insulation

Fiberglass insulation is *made from tiny glass fibers and is available in rolls, batts, or loose-fill forms. It's easy to install and provides good thermal resistance.

2. Cellulose Insulation

This insulation is crafted from recycled paper and treated with fire-resistant chemicals. It's eco-friendly and great at filling small gaps and spaces effectively.

3. Spray Foam Insulation

This is a top choice for attics because it expands to fill every nook and cranny. It has a high "R-value," which means it's great at resisting heat transfer, and it's also known for sealing out air effectively.

You may also like to discover How much does it cost to replace a roof in Toronto, Canada?

DIY vs. Professional Attic Insulation

DIY or professional is the major dilemma like in some projects DIY may be best and in some it's not. So, the whole thing depends on the pros and cons that comes with both. Let's see the pros and cons of both and then decide which one you should choose.

DIY Attic Insulation

Firstly, let's look at the pros and cons of DIY attic insulation:

Pros:

  1. Cost Savings: DIY insulation can be more budget-friendly since you don't have to pay for labor.

  2. Flexibility: DIY bring flexibility like you can work at your own pace and schedule.

You may also like to discover Is Duct Cleaning necessary? Is it worth it?

Cons

  1. Skill Requirement: Insulating an attic requires some expertise and knowledge of safety precautions.

  2. Time-Consuming: It can be a time-consuming project, especially for beginners.

  3. Equipment Costs: You'll need to invest in tools and equipment.

Professional Attic Insulation

Now let's also check the pros and cons of professional attic insulation:

Pros:

1. Expertise: Professionals have the experience and knowledge to ensure the job is done correctly.

2. Time-Efficient: Hiring experts can save you time, and they'll complete the job faster.

3. Guaranteed Results: Professionals can provide warranties and guarantees on their work.

Cons:

1. Higher Costs: Professional installation can be more expensive due to labor and equipment costs.

2. Limited Control: You may have less control over the project's timing and execution.

3. Finding a Reliable Contractor: It can take time to find a reputable and reliable insulation contractor.

As we have compared the pros and cons of both the type of insulation and now it totally depends on you.

You may also like to know Why You should not DIY Spray Foam Insulation?

Attic Insulation

Attic insulation not only saves your money but it also provides comfort. So, it's very important to choose the right type of insulation and right time to get it done. Though we have covered everything to help you in deciding every aspect of attic insulation, but if you still need any help you can contact to the professionals for the same.


Last Updated: 

Mar 28

attic insulation
time for attic insulation
attic insulation benefits
attic insulation canada

Write your comment 

Comments

Be the first to comment
Related Articles

10 Best Home Improvement Blogs to Follow in Canada

If you are planning for a complete kitchen redesign, need to brighten up your backyard, or do it yourself, then **home improvement blogs** are your best friends. But enquiring locally is a hassle, at least in Canada, where every aspect of your home seems to be influenced by changing seasons. Like choosing the best paintings that will survive the Alberta winters and how to keep your attic warm in Quebec, local advice is worth gold. Blogs are just not about home improvements, trendy decorations, and fashionable pictures. They impart practical hands-on tips and directions based on first-hand professional experience. From people sharing their trade secrets to documenting their renovation process, the details we shared here are full of great ideas and tips. Most of them are Canadian homeowners, who will give you an idea of what to look for during your home improvement process. ## 10 Best Home Improvement Blogs to Look for Here is the list of some of the trending home improvement blogs filled with great knowledge and practical solutions. ## 1. UrbanTasker UrbanTasker is not just a platform for Canadians to connect with reliable home service professionals. But, it also has an interesting **[home niche blog](https://urbantasker.com/blog)** section, a dynamic resource designed to benefit both homeowners and service providers alike. For homeowners, it offers practical tips, seasonal guides, and expert insights that make home improvement, maintenance, and renovation decisions easier and more informed. Meanwhile, service providers gain valuable exposure through featured content, trending topic coverage, and educational posts that position them as trusted experts in their field. This helps them attract new clients and stand out in a competitive market. Together, the UrbanTasker blog fosters a vibrant community built on knowledge sharing and connection. UrbanTasker is your all-in-one destination to post tasks effortlessly, hire local professionals with confidence, and expand your knowledge with expert tips and insights—all in one place. No fluff, only practical information! Join the UrbanTasker community now! **[Post Your Task](https://urbantasker.com/tasks/create)** and Get Free Quotes from Skilled Providers in your area. ## 2. The Young House Love The Young House Love is a motivational DIY blog that follows the moulding escapades of John and Sherry Petersik in their mission to redesign their home. Using mostly hand-me-downs and their crafty ideas, this blog is full of inspiration for those who want to have a high-end finished product on a budget. Credibility is one of the many things this blog offers to its readers: descriptive content and compelling narration. Young House Love releases its post once or twice a week, sharing room designs, renovation of furniture, home storage, and decor tricks. ## 3. Bob Villa Bob Villa is your home guru, and his blog provides you with amazing tips and techniques from professionals to all kinds of homeowners. Bob Villa and his team give you information and lots of skills to restructure the bathroom of your home or just clean it up. Some might consider the writings of Bob Villa to be conservative, with their wide range of topics delivered with a strong authority. Updates are issued weekly, and the subject covers home repair, renovations, remodelling, landscaping, and even some specific tools. With that said, here all your questions will be answered about the home improvement project. ## 4. Best Builders Blog The Best Builders Blog is the site where the craftsmanship meets the beauty of architecture that is celebrated in Western Canada. The blog has both informative and inspirational content about award-winning custom homes and designer finishing. They go into the details of the rainy climate of B.C. including waterproofing, antifungal building materials, and solutions that turn aesthetics into a higher art form. The reader is well informed of the reason behind choosing certain timbers and how readers can reduce the cost of expensive finishes. If you are a fan of good craftsmanship and detail, then this blog is perfect for you. ## 5. Rambling Renovators Rambling Renovators feels as if you are exchanging renovation stories with your family. The centre of the blog is Jen, who oversees everything from modernizing the outdated kitchen to renovating the laundry rooms in her Canadian home. She is truthful, humorous, reliable, and relatable, and her writing style is immaculate. Free of usual hiccups along the way and no sticker shock, Jen guides you through the good and the bad and every once in a while, the ugly. She also interjects some seasonal tips along with product reviews from a Canadian standpoint. If you are a beginner or someone who wants a dose of reality, then Rambling Renovators is your go-to place. ## 6. Homey Improvements This blog is a resourceful site for tips and affordable home improvement projects to refresh the living environment without straining your bank account. Whether it's straightforward DIY repairs or Homey Improvements, they provide practical solutions on how to turn your place of living into something more lively and comfortable. Homey Improvements posts affordable and sustainable products. Its content is updated regularly to include home maintenance, **[budget remodelling](https://urbantasker.com/blog/how-much-should-i-budget-for-home-maintenance-repairs-in-canada)**, and even do-it-yourself home improvement projects. ## 7. Kitchen & Bath Blog Kitchen & Bath Blog takes you deep into the ideas of kitchen makeover and bathroom retrofitting with expert thinking and style. The authors of the books, usually professionals, are not afraid of difficulties such as narrow rooms, non-standard plumbing plans, or non-standard ventilation problems. All of their posts feature real renovation projects like a family kitchen transformed into a cosy entertaining area, or a bathroom created to feel like a small spa. There is also this Canadian perspective, where moisture-resistant materials are added to deal with humid summer weather and the issue of cold climates. Want a gorgeous and practical kitchen or a plush bathroom? Then this blog is filled with imagination as well as the practical solutions to execute it. ## 8. Remodelista Remodelista is based on the ideas of timeless design and craftsmanship, and includes a set of extravagant home renovations and global design inspiration. It offers an array of designs to fit all kinds of tastes, whether it is Scandinavian minimalist or simple farmhouse. Remodelista also has beautiful photography and well-selected content on its page. But, readers who have a limited budget might be discouraged by its focus on luxury. It has periodic updates featuring home tours with careful details, product lists, design trends, and architectural content. Also, have a look at **[5 Best Home Renovations to Increase Your Home's Value Before Selling](https://urbantasker.com/blog/best-home-renovations-to-increase-your-home-value-before-selling)** ## 9. Apartment Therapy Apartment Therapy is a home improvement blog that considers both the needs of urban residents and people who live in tiny apartments. Apartment Therapy offers practical space-saving tips, convenient do-it-yourself projects, or anything that helps to make any home look better and highly functional. It gives you a new point of view on the improvement of living spaces and interior design. Their blogs are generally on the city lifestyle and the economic aspect, but there is a slight chance that the content provided by the site may be too narrow in its focus. They release new material from time to time, which includes information about small space design, organization hacks, decorating hacks for rentals, and sustainable living. ## 10. Peak Improvements Peak Improvements strives to make each post sound as if a friend is telling a story about her remodeling project with its exciting tales and recommendations. The stories are based on before and after images, materials lists, cost breakdowns, and desirable timelines. They show real-life makeovers of home rooms converted to family room, contemporary kitchen, and old-fashioned rooms, etc, with revived allure. They even plunge into some local tips when it comes to heating, insulation, and moisture control, as Canada has a wide range of climate regions. Also, have a look at our exclusive article on **[Women in Skilled Trades in Ontario, Canada: Breaking Barriers and Building the Future](https://urbantasker.com/blog/women-in-skilled-trades-ontario-canada-programs-funding)** ## Why Home Improvement Blogs are an Important Resource? Home improvement blogs are an important resource because they offer practical tips, creative ideas, and expert insights to help homeowners make informed decisions. They inspire projects big and small, turning ordinary spaces into personalized, functional, and beautiful homes. Articles can go anywhere in length up to a full-blown renovation scheming with step-by-step actions and honest thoughts. When you need an inspiration that gives a pinch of reality in addition to troubleshooting assistance, then Home Improvement Blogs is your go-to place. Which is your favourite Home niche blog? Do share in the comments. ### What is the Ultimate Home Renovation Checklist? Before going through an actual renovation, you first need a renovation checklist to make things easier. - You should begin by setting your objectives in terms of renovation. - Tour your place and make a list of things that have to be changed. - Strictly observe the proper order: demolition, plumbing, electrical, painting, and flooring. • Find the duration and the cost of each step that meets your needs. - Make a single file for everything or two applications, and use an updated checklist when carrying out a renovation. Home improvement blogs guide you in gaining useful information, inspiring ideas, and practical tips to enhance your living space. You may also like **[7 Ways to Prepare Your Home for Summer Season in Canada](https://urbantasker.com/blog/ways-to-prepare-your-home-for-summer-season-canada-maintenance)** ### What is the Right Plan for My Home Renovations? Everybody needs the right plan for their home renovations. - Make an affordable budget and mention a contingency of 10- 20 percent. - Establish what you are going to be doing and what you are going to have to contract out. - Get ideas through Pinterest, magazines, or Canadian blogs. - Interview the contractors and find different quotes. • - Go through license verification, insurance, and work reviews. - Make a list of all things in a folder or app and easily refer to them. Home improvement blogs can help you figure that out by offering expert tips, real-life project ideas, and step-by-step guides to plan smarter and renovate better. ### Home Improvement Blogs A home renovation can feel overwhelming, but with the right tools and creative ideas, it becomes much more manageable. A bit of organization and learning can make it a thrilling and satisfying experience. Be it a complete rework of your kitchen or just a small renovation to your bathroom. These Canadian home improvement blogs will provide you with all the assistance and inspiration that you need. Start by having a good plan, and do not hesitate to seek assistance. Have a favourite Canadian home improvement blog or tip to share? Drop it in the comments — we’d love to hear what inspires your next project!

How much does it cost to install Gazebo in Canada?

Gazebos, also known as garden pavilions or pergolas, have long been cherished additions to outdoor spaces, providing a charming and versatile retreat amidst nature's beauty. In Canada, where the outdoors plays a significant role in lifestyle and leisure, gazebos hold a special place in enhancing outdoor living spaces. That's why it becomes important to consider all things before going for the installation and cost is one of them. ## What are the Steps Involved in Gazebo Installation? Here are the most important steps involved in typical Gazebo installation: ### 1. **Site Preparation:** The first step is site preparation. This step is important and crucial because it ensures an adequate space for the gazebo along. So, if you have decided to do yourself then consider factors such as drainage, proximity to surrounding structures, and potential obstructions. ### 2. **Foundation Preparation:** Generally in foundation preparation, concrete slabs or piers are used for larger gazebos, while smaller gazebos gravel or compacted soil is used. ### 3. **Frame Assembly:** The gazebo frame is assembled piece by piece, ensuring proper alignment and adherence to manufacturer's instructions. Precision is essential to ensure the gazebo's stability and structural integrity. ### 4. **Roof Installation:** The roof's material, whether wood shingles, metal roofing, or vinyl panels, is installed according to the manufacturer's guidelines. Proper sealing and ventilation are crucial to prevent water damage and ensure weatherproofing. ### 5. **Final Touches:** Once the frame and roof are in place, finishing touches are applied, including installation of railings, lighting, and any decorative elements. ### 6. **Inspection and Adjustments:** In this step, a thorough inspection is conducted to ensure the gazebo is properly assembled, levelled, and secure. Any necessary adjustments or modifications are made to guarantee stability and functionality. Also, have a look at **[What are factors that affect the Price of Interlocking Driveways, Patios & Walkways?](https://urbantasker.com/article/what-are-factors-that-affect-price-of-interlocking-driveways-patios-walkways)** ### 7. **Erection and Enjoyment:** With the gazebo fully installed, it's ready to be raised to its final position. Once ready, you can use your newly covered space and use it to for different purposes. You may also like to explore **[Weed Control for Lawns in Ontario, Canada - What are the Best Options to Remove Weeds?](https://urbantasker.com/blog/weed-control-for-lawns-in-ontario-canada-best-options-to-remove-get-rid-of-weeds)** ## How much does it cost to install Gazebo in Canada? The cost of gazebo installation in Canada varies depending on several factors, including the size, complexity, materials, and labor costs. However, a general estimate for gazebo installation ranges from $2,000 to $10,000 or more. You may also like to know **[Pergola vs. Gazebo: What's the difference?](https://urbantasker.com/blog/pergola-vs-gazebo-what-is-the-difference-which-is-better)** ## Gazebo Installation Cost - Key Factors to Consider ### 1. Gazebo Size and Complexity: Larger and more intricate gazebos often involve more extensive foundation preparation, structural components, and roofing materials, leading to higher installation costs. ### 2. Material Selection: Gazebos are typically constructed from wood, metal, or vinyl, each material having its own price range and aesthetic appeal. Wood gazebos offer a classic and natural appearance, while metal gazebos provide durability and weather resistance. Vinyl gazebos are lightweight and easy to maintain but may not have the same level of longevity as wood or metal. ### 3. Location and Site Preparation: The location of the gazebo can impact installation costs. For instance, gazebos installed on uneven or sloped terrain may require additional foundation work, increasing the overall cost. ### 4. Labour Costs: Labour costs significantly contribute to the overall installation expense. Experienced and skilled professionals charge higher rates compared to those with less experience. You may also like to learn **[When is the Best Time to Insulate Your Attic?](https://urbantasker.com/blog/when-is-best-time-to-insulate-your-attic)** ## Detailed Breakdown of Cost of Gazebo Installation in Canada **Gazebo Materials** * **Wood gazebo:** $500 to $5,000 * **Metal gazebo:** $2,000 to $10,000 * **Vinyl gazebo:** $1,000 to $3,000 **Foundation** * **Concrete slab:** $200 to $500 * **Pier foundation:** $500 to $1,000 **Roofing** * **Wood shingles:** $500 to $1,000 * **Metal roofing:** $1,000 to $2,000 * **Vinyl roofing:** $500 to $1,000 **Hardware** * **Nails:** $50 to $100 * **Screws:** $50 to $100 * **Nuts and bolts:** $50 to $100 **Labour** * **Experienced contractor:** $50 to $100 per hour * **Less experienced contractor:** $25 to $50 per hour **Total Cost of a Typical Gazebo Installation in Canada** * **Gazebo materials:** $2,000 * **Foundation:** $500 * **Roofing:** $1,000 * **Hardware:** $200 * **Labour (experienced contractor):** $1,000 **Total:** $ 5,000 to $ 6,000 (Approx.) You may also like to discover **[All Season Lawn Care Tips for Canadian Homeowners - A Complete Guide](https://urbantasker.com/blog/all-season-lawn-care-tips-canada-spring-summer-ideas)** ### Additional Gazebo Installation costs In addition to the cost of the gazebo materials, foundation, and labor, there are few other things that you need to consider. Like: - **Permits**: Not all gazebo installation required permit but in case it's bigger in size and you need building permit then you it will costs you around $50 to $200. - **Delivery and setup**: If you are purchasing a pre-fabricated gazebo, you may need to pay for delivery and setup. This can cost anywhere from $200 to $500. - **Accessories**: Accessories means curtains, screens, or furniture. These accessories can also add to the overall cost of installation. ## DIY vs. Pro Gazebo Installation: This is the most common question comes in people's mind. There are pros and cons of both. So, let's look at both the sides. ### 1. Cost One of the most important factors to consider is cost. DIY installation is generally more affordable than **[professional Gazebo installation](https://urbantasker.com/article/estimated-costco-gazebo-installation-cost)**. You'll just need to buy the materials, which can range from $2,000 to $8,500. But if you don't have any tools, you'll need to factor that into the cost as well. On the other hand, if you go for the professional installation, then cost will be higher and you will have to pay around $1,500 to $9,000, plus $700 to $1,300 for construction plans (if needed). ### 2. Pros and Cons Gazebo installation is one of the **[popular backyard projects](https://urbantasker.com/blog/top-outdoor-living-projects-homeowners-love-summer-season-trends)** that homeowners prefer getting done in the summer season. Both DIY and professional installation have their own advantages and disadvantages. **DIY Gazebo Installation** - Pros: More affordable, can be a rewarding experience - Cons: Can be time-consuming and complex, requires construction skills, no warranty **Professional Gazebo Installation** - Pros: Less time-consuming and complex, no construction skills required, warranty typically offered - Cons: More expensive ### Gazebo Installation - DIY or Hire a Professional It really depends on your situation. Like if you have time and skills but you know tight on budget then DIY is the best considering you are aware of the cons. However, if you're short on time and don't have much construction experience, or want the peace of mind that comes with a warranty, it's best to hire a professional. You may also like to explore **[How much does a full kitchen renovation cost in Toronto, Canada?](https://urbantasker.com/blog/how-much-does-full-kitchen-renovation-cost-in-toronto-ontario-canada)** ## How to save money on Gazebo Installation? Here are a few money saving tips for you in gazebo installation: * **Choose a smaller and simpler gazebo:** Smaller gazebos are easy to install and also they are less costly. * **Use recycled materials:** You can easily get the recycled material from the construction sites, salvage yards, and even online marketplaces. So, if you are using recycled material then you can significantly reduce the cost on material and hence save money. * **Do some of the work yourself:** If you have read the above cons of DIY and you are okay with that then it's the best option and even if you * **Get multiple quotes:** Before you hire a contractor, get quotes from several professionals. This will help you ensure that you're getting the best possible price. Don't miss to read **[How much does it cost to install a Sliding Patio Door in Canada?](https://urbantasker.com/blog/how-much-does-it-cost-to-install-sliding-patio-door-canada)** ## Gazebo Installation in Canada Gazebo installation can be an expensive task. So, before installation, plan properly and make sure to consider and follow all the steps and tips. In case you are not clear or have some doubts in gazebo installation then do consult to the professionals.

A Complete HVAC Maintenance Checklist for Homeowners in Canada

**A Complete HVAC Maintenance Checklist** is a homeowner's best friend in all seasons. It delivers comfort in your home regardless of the outside temperature. Whatever the machine or appliance is, trouble-free operation and performance is based on its regular maintenance. Taking seasonal maintenance lightly jeopardizes your comfort. Skipping it risks your comfort. Imagine this, on a hot summer day, your air conditioner suddenly fails without any prior notice! It's difficult to even think of this in the hot and humid weather of Toronto. Maintenance is important for performance and longevity, whether it is an automobile, an electric motor, or an air conditioner. But you don't have to worry! By following a structured checklist, you can prevent unexpected breakdowns and ensure your HVAC systems consistently deliver reliable performance as designed. ## Importance of HVAC Maintenance Let’s be honest, energy costs in Canada can feel like a rollercoaster, and no one likes opening a hydro or gas bill that’s higher than expected. This HVAC Maintenance list covers every aspect, helps you stay ahead of problems, and protects your investment. Plus, with the Government's increasing recognition of energy-efficient upgrades for residential homes, it pays to have your system performing at its best. A properly serviced HVAC system is not just more reliable, you will be using less energy and getting a longer mileage out of your system (which eliminates the chance of having to pay for a new furnace sooner than you want), and breathing cleaner air. But most importantly, regular maintenance eliminates the odds regarding some rather scary situations - like your furnace malfunctioning in the middle of a -25°C snowstorm or your AC failing at the peak of a +30°C heatwave. If you've lived in Canada during the winter or summer, then you know this risk is not worth taking. ## The Homeowner’s HVAC Maintenance Checklist To accomplish these tasks, some can be done by you (DIY), but others may require a visit from a professional. ## Monthly Maintenance Tasks The monthly maintenance tasks include: ## 1. Check and Change Air Filters You should check your air filters for a variety of reasons, but mostly, filters are there to keep dust and allergens from entering your home. Especially in winter when the windows are closed all the time. So, it is better to change the filter every one to two months. ## 2. Inspect Vents and Registers Vents and Registers need to be checked once in a while to check whether they are blocked by any object. If blocked, open it up for airflow. Dust with a microfiber cloth lightly to make sure it is dust-free. ## 3. Monitor Thermostat Settings Smart thermostats are widely popular all over Canada. They come up with several features. You can check the app’s energy report monthly to keep track of usage. You may also adjust schedules to prevent any wastage of energy. ## Seasonal HVAC Maintenance Checklist The weather in Canada can change drastically at times. So, let's go through the seasonal maintenance list: ## Spring: Prepping for Cooling Season When the snow starts to go away, it’s time to prepare your air conditioning. Now, it’s time to turn the Furnace Humidifier off. This prevents the growth of harmful bacteria and mould. You can also clean the area around the Condenser to remove any leaves, twigs, or debris. Inspect whether the refrigerant lines are insulated. If the insulation is cracked or is missing, replace it. It is also necessary to test your **[Central Air Conditioner Unit](https://urbantasker.com/blog/best-central-air-conditioner-brands-in-canada)**. Run the air conditioning for a short time in the spring. Listen for odd sounds and see if cool air flows out evenly. Identifying problems at this early stage means you’ll have no unpleasant surprises on that first scorching hot day. You may also book a Professional Tune-Up. A trained technician will clean the coils, check the refrigerant levels, and identify any issues ahead of the heat. ## Summer: Keeping Cool Efficiently The summer maintenance checklist includes a few steps. As your AC produces moisture, check the Condensate Drain often. It helps eliminate issues such as water damage or mold growth. Keeping the windows and doors shut limits any possible cool air loss. This is also good for your HVAC as it reduces stress. If you have smart settings or programmable schedules, you may slightly increase it’s temperature while you are away for the day. Even 2-3°C can save you money but still be comfortable. You may also like to learn **[How to Climate Proof Your Home? 10 Upgrades for A Climate-Resistant House](https://urbantasker.com/blog/climate-proof-your-home-upgrades-for-climate-resistant-house)** ## Fall: Transitioning Back to Heat Fall brings allergies with it. So, check the filter of the furnace and install a new one before you start heating. You should also check the colour of the flame. A healthy flame is blue. Yellow indicates carbon monoxide issues. In this case, call the technician as soon as possible. You can also look for gaps, leaks, and dust. Sealing the gaps can improve efficiency by 20%. It is necessary to perform an annual furnace checkup. A professional will check heat exchangers, burners, and safety controls to ensure everything performs well. ## Winter: Protecting Yourself Against the Polar Freeze When temperatures dip, your HVAC unit works the hardest! Look for Ice and Snow Accumulation. If you have a heat pump or exhaust outlet from an outdoor furnace, make sure snow is not obstructing the path of the air intake. In fact, be sure to clear snow around the heat pump or exhaust outlet after any snowstorm. You should also watch for Energy Bills. If your bill spikes suddenly, it could mean your furnace is working harder than normal. You must be careful about the odd noises. Banging, grinding, and rattling sounds shouldn’t be ignored. Call for service immediately. During peak heating season, try to replace your filters monthly. You may be surprised how much more efficient your furnace is when using your ceiling fans, too. You can reverse the way the fans spin. Use a small speed and spin clockwise. This will push warm air down into your room. This will help reduce the workload on your furnace. ## Signs It’s Time to Call a Professional While home maintenance can get you pretty far, there are times when you'll want to have a professional take care of things. If you notice these signs, it's time to call a licensed HVAC company: - A strange smell (this includes burning, rotten egg, musty, etc.). - Heating or cooling is uneven in multiple rooms. - Very loud grinding or squealing noises. - The system has frequent cycles (turns on and off) often or very fast. - You notice that your bills have spiked for no good reason. You can use Home-Service Platforms like UrbanTasker to **[Post Your Task and Get Multiple Quotes](https://urbantasker.com/tasks/create)** from experienced professionals in no time. ## Smart Maintenance Tips for Canadian Homes A homeowner can benefit a lot with these smart tips: ### 1. Make Use of Rebates In 2025, the Canadian Government will provide rebates for upgrading to energy-efficient HVAC systems with heat pumps in particular. Examine the federal and provincial programs for your eligibility. ### 2. Consider a Smart Thermostat Most utility providers in Canada offer discounts or rebates to have them installed. On average, they save on cooling and heating costs between 8 to 15%. ### 3. Establish a Maintenance Calendar Create a calendar on your phone for the filter inspection and seasonal preparations. ### 4. Understand the Age of Your System Furnaces last typically 15 to 20 years. Most central AC systems last an average of 10 to 15 years. If your unit is nearing the life expectancy, begin the budgeting process for a new system. ### The Ultimate HVAC Maintenance Checklist For Canadian Homes This is why an **[HVAC maintenance checklist](https://urbantasker.com/blog/importance-of-hvac-maintenance-how-skilled-technician-can-help)** isn't just a "nice to have" thing; it's going to save you headaches in the future. The best thing is that it doesn't require a lot of effort! Changing a filter when it looks dirty, brushing some snow off the vents after a storm, or just checking your thermostat settings once in a while - those are easy jobs. The best thing is, it doesn’t take much. Swapping out a filter when it looks dirty, brushing a bit of snow off the vents after a storm, or just giving your thermostat settings a quick glance—those are tiny jobs. But over time, they make a massive difference. Cleaner air, lower bills, and a furnace or AC that doesn’t give up on you years before it should. And let’s be real: nobody wants to be hunting down an emergency repair guy when it’s -30 degrees outside in Winnipeg or sweating through a humid Toronto July night. So here’s a suggestion: don’t wait until something breaks. Take out your phone, make a couple of reminders in your calendar, and try to get a tune-up appointment with a pro before the peak season hits. It’s one of those little things that pays dividends in comfort and peace of mind. Your future self will thank you for it!

Why Summer Is The Perfect Time To Tackle Your Home Renovation Projects?

Summer is not just about sunshine, vacations, and longer days, but it is also the best time to start with all long-pending house renovation projects. You might be thinking of getting your kitchen remodelled or getting the exterior stucco re-painted. The summer is the very place to do it because of it's weather, time, and energy. But have you ever wondered why summer is the best season for renovations? If you are thinking the same, this blog is perfect for you. Let's dive deep into it. ## The Best Season for Home Renovations Here is why, summer is the perfect time for home renovations: ## 1. Long Days, More Working Hours Unlike winter, where work gets finished early because of shorter says and freezing cold, the longer day is one of the greatest benefits of summer. More natural light signifies additional time to work upon and more freedom for homeowners, contractors, and even DIY. So, what does that mean? - You are able to complete projects in less time. - Contractors are able to work under tight schedules. - Delay caused by daylight limitations will not occur. ## 2. The Perfect Weather Renovations of homes, especially outdoors, including roofing, painting, landscaping, and construction of decks, are strongly weather-based activities. The best conditions in summer are available in: - Outdoor painting as the paint dries quickly in warm conditions. - Roof repair or replacement of roof like shingles as it sticks much better in heat. - Working with concrete. - Landscape gardening. ## 3. Flexibility in Vacation time One of the biggest advantages of scheduling home renovations during your vacation is flexibility. Since you’re already away from your daily routine, it’s easier for contractors to work without interruptions, and you don’t have to adjust your schedule around the noise, dust, or temporary inconveniences. Some of your home projects might include: - Full kitchen renovations - Improvements in the bathroom - Flooring - Organizational changes You may also like to learn about **[The Importance of HVAC Maintenance & How A Skilled Technician Can Help?](https://urbantasker.com/blog/importance-of-hvac-maintenance-how-skilled-technician-can-help)** ## 4. Proper Ventilation of Projects The procedure of painting walls, refinishing cabinets, and setting up of new floor usually pollutes the air with fumes and dust. In most cases, both irritating and even toxic, unless the inferences have proper ventilation. In summer, you will be able to open windows easily, use fans, and make the air circulate without going cold due to freezing weather. The fresh air accelerates the drying of paint and varnish and makes your home a safer place in the process of renovation. The projects include: - Painting of house. - Staining of hardwood floor. - Setting of tiles. ## 5. Increased Access to Materials and Services Home improvement retailers, contractors, and service providers usually work best during the summer. Owing to this, you are likely to encounter frequently: - More choices in inventory at the hardware and home improvement stores. - Seasonal sale-off and offers on renovation material. - Availability of skilled labour, tradespeople and professionals. ## 6. Increasing the Curb Appeal to Prepare Before Fall Summer repairs do not mean replacing everything that does not work, but upgrading and improving your home and its appearance. This is the time of summer to do curb-appeal projects such as: - Outer paint work. - Replacement of the windows. - Repairs of driveways. - Improvements to the lawn and garden. - Stilt Wind break reconstructions (Fence installations). You may also like to explore **[Summer's Hottest 5 Tasks: What Everyone’s Posting on UrbanTasker?](https://urbantasker.com/blog/summer-hottest-tasks-what-everyone-posting-on-urbantasker)** ## 7. Summer is Budget-Friendly It is hard to digest, but summer may allow you to save money. Even though the demand for contractors is higher, a great number of suppliers and retailers introduce significant discounts during summer sales. This includes: - Canada Day deals - End-of-season sales - Do-it-yourself sales in big-box shops ## 8. Getting Your Home Ready for Winters Most of the homeowners of residential properties start to consider winter preparations only when it is already cold. During the Summer, you get time to: - Make your attic warm. - Change olden windows and doors. - Plug fissures and couplings. - Seal cracks and gaps. - Reparations for heating problems. - Increase insulation. ## 9. Best Time of Outdoor Additions Trying to get the best out of your backyard, patio, or garden? Then, consider these projects: - Decks and patios - Outdoor kitchens. - Build Pergolas. - **[Lawn Sprinkler Installation](https://urbantasker.com/blog/lawn-sprinkler-system-installation-essential-tips-and-benefits)** - Seatings and firepits. - Swimming pools, or spas. ## 10. Optimal Season By renovating during the summer, you will have the upper hand over the fall and holiday seasons. When school starts and cold weather begins, the last thing you want is a messy kitchen or active construction dust. Benefits of completing it during the summer: - This will help you be prepared for other seasons. - Children also have an opportunity to go back to school without residing in a renovation area. - It allows you to have some rest in the fall and winter. ### Summer - The Best Season for Home Renovation Projects Whether you have been on the lookout to get started on that home renovation plan, summer can turn out to be your golden hour. Summer ticks all the boxes of a successful home improvement, as it offers everything a person needs, including the ideal weather and more time of the day. It does not matter whether you have a large-scale kitchen renovation project or a few select alterations; you can gain a lot by considering your renovation plans in the light of the summer season. The quality of workmanship, timing, and money would suddenly become easier on the economy. And if you want to find skilled professionals but have no idea where to start, **UrbanTasker** connects you with local providers in your area. Just **[Post Your Task](https://urbantasker.com/tasks/create)** and get free multiple quotes.

How to Climate Proof Your Home? 10 Upgrades for A Climate-Resistant House

**Climate-proofing your home** isn’t just a trend — it’s quickly becoming a necessity. But where do you even begin when it comes to protecting your home from floods, heatwaves, and wild weather? In this article, we will share **practical, effective, and sometimes surprising improvements to improve the resilience, energy performance, and longevity of your home**. Whether you’re refreshing an older home or adding smart, subtle upgrades, this blog highlights practical improvements that are both budget-friendly and built to last. We’ve also highlighted the upgrade costs, helping you plan wisely and strike the perfect balance between sustainability and affordability. ## Why Climate Proofing Your Home is Important? Today's climate change is not just a debatable phenomenon on the evening newscasts but a very real experience in our own backyards. From hot summers and cold winters to sudden flash floods, wildfires, and even unwelcome pests, they are here in ways we have never experienced before. Heatwaves and intense storms are becoming more frequent, affecting cities and ecosystems alike. These changes threaten wildlife, human health, and Canada’s vital natural resources. ![Climate Proofing Upgrades Cost Table.png](https://newassets.urbantasker.com/gallery/Climate_Proofing_Upgrades_Cost_Table_b74a5976d9.png) ## Why Climate-Proofing Your Home Matters? Lessons from Toronto’s Record Rainfall On July 16, 2024, Toronto was hit by an unprecedented downpour! If you remember, there was almost 100 mm of rain in just a few hours—flooding roads, halting transit, and leaving thousands without power. This wasn’t a random summer storm: climate change added fuel by loading the atmosphere with extra moisture, transforming heavy rain into a historic flood. Urban landscapes are unable to absorb water quickly enough, and this incident has turned into a very real warning indicator for city dwellers. It is no longer a debate about whether or not we should climate-proof our residences and infrastructure, but rather an imperative of safe living in this climate. Not only does it assist in getting your home comfortable, it also helps in preventing future damage, thereby saving you money and time down the line. It also helps you be sustainable by controlling your carbon footprint. **Are you ready to insulate your home against climate change? Have you taken steps to climate-proof your home, or are you still thinking?** ## How to Climate Proof Your Home? 
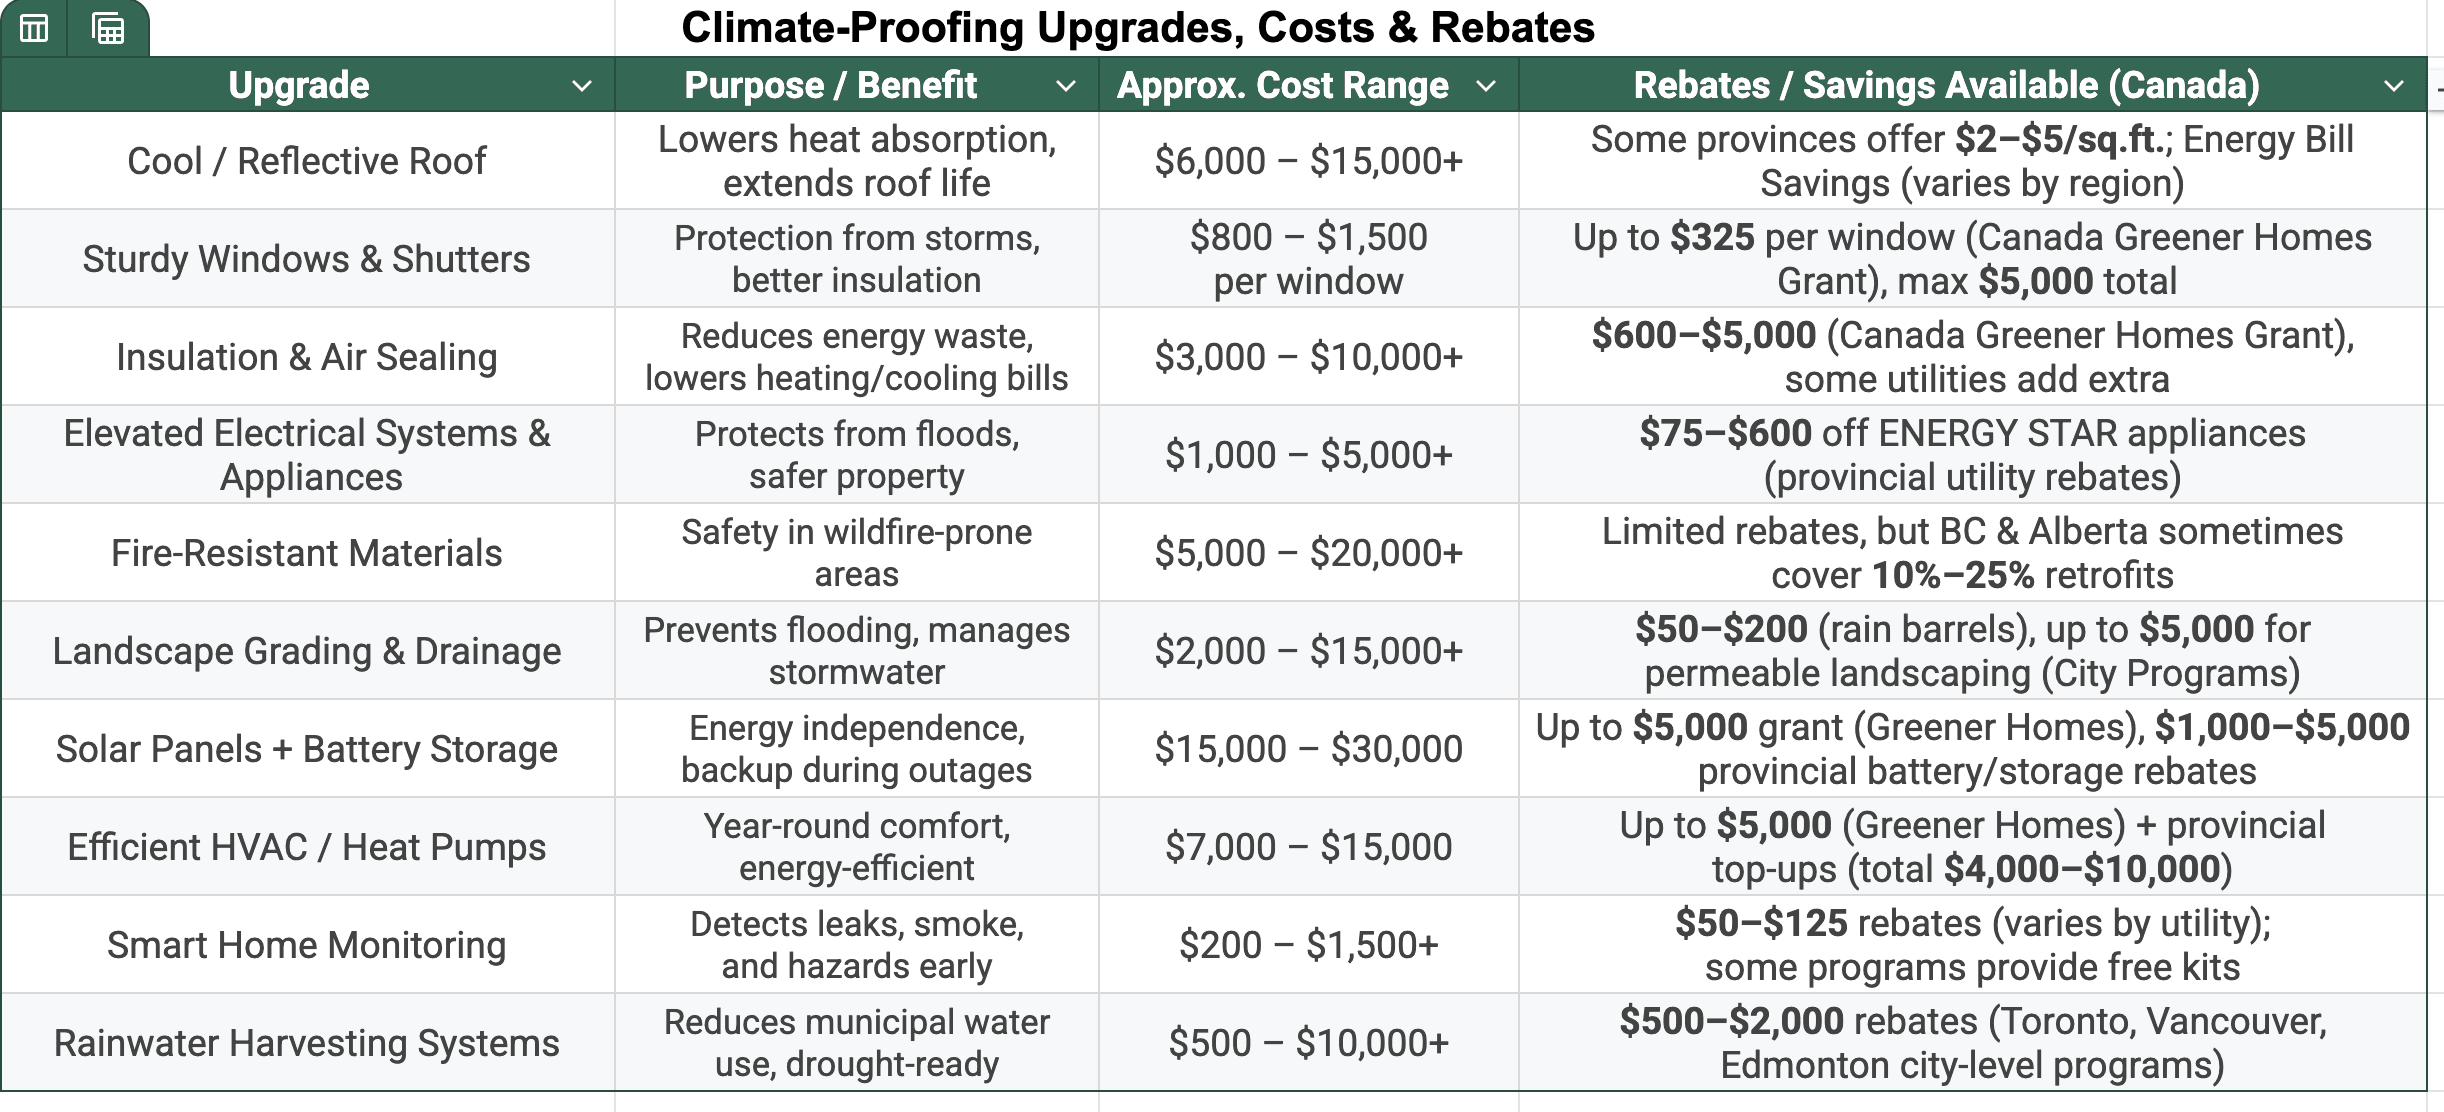
Here’s the list of some common upgrades that improve durability, minimize energy requirements, and make your life more comfortable. ## 1. Installation of a Cool or Reflective Roof Your roof is the first line of defence for your house. Black-coloured roofs are heat absorbers, and consequently, your home's temperature goes up and your bills as well. In order to reduce the impact of blistering sun, select efficient shingles, tiles, or coatings since they are capable of reflecting a majority of sunlight. This action can not only minimize cooling expenses but also increase the life of the roof.This simple change can be the first step of your climate-proof home. Depending on your specific situation, reflective coating for an existing roof usually costs $0.75 to $4.50/square foot, so for a typical 2000 sq ft. roof, that’s approximately $1,500–$9,000. If you’re replacing your roof, reflective shingles are similar in cost to traditional shingles ($6.00 – $8.50/ square foot installed). Metal roofing with a reflective finish costs more ($13–$28 per sq ft) but lasts 40–70 years and can reduce summer cooling costs by as much as 40%. In addition, in Canada, homeowners can even receive funds for reflective or cool roofing via their provincial rebate incentive programs. As an example, in Ontario, the home efficiency rebate plus (HER+) and the federal greening homes grant could provide a rebate for weatherproofing, cool roofing, up to $1,625. It is a part of a total rebate package of $10,000. In British Columbia, the CleanBC Home Renovation Rebate Program has been funding energy-efficient upgrades and can provide homeowners $12,500 with a maximum combined rebate if roofing renovation is combined with other upgrades. ## 2. Installation of Sturdy Windows and Shutters Windows are weak points during severe weather conditions. Having a robust window will be your saviour when it comes to storms and hurricanes. It shields your home from damage caused by flying objects and wind. You can opt for double or triple-glazed windows since they insulate. It can also cut the effects of noise, together with longevity. Therefore, it is a win-win situation. Instead of putting it towards climate-proofing renovations, anything that contributes to a more energy-efficient and safer climate-proofed home is good. New energy-efficient windows typically cost between $600–$1,200 per window, depending on the size and style. So if you are getting 8–10 windows replaced, it amounts to roughly $6,000–$12,000. Receiving a Federal grant can provide up to $325 per window opening that is replaced with an ENERGY STAR certified model. And when you have many windows to replace, that could add up to $2,000–$5,000 back in savings. ## 3. Properly Insulate and Seal Your Home Gaps in your house can lead to energy waste. You need to seal those openings around your windows and doors for temperature regulation. You can get sprayed foam insulation, weather stripping, and caulking to seal your house airtight. Insulation also minimizes the requirement of an external heating and cooling system as it keeps the house at an even temperature. Thus, it can be the most cost-efficient method of constructing a climate proof home. In Canada, the cost of insulation ranges from $1.50–$4 per sq ft, and hence an average project area of 1,000 sq ft will cost around $1,500–$4,000 in total. Based on the location of the insulation (walls, attic, or basement), residents can expect to get between $600–$10,000 as incentives. If you also air seal your home, it is possible to get some bonus incentive cash. ## 4. Elevate Electrical Systems and Appliances Properties with appliances and wires are more susceptible to flooding or any other type of water exposure. Building a safe property requires elevating water heaters, HVAC systems, outlets, and wiring to reduce the risk of fire. Installing a sump pump with battery backup is the right course of action if you live in a low-lying area or an area that floods easily. Relocating your electrical panels to higher elevations than the probable flood levels is something you should consider. You will reduce the likelihood of damage from natural disasters by doing this. Elevating appliances and electrical systems typically costs $1,000–$5,000, depending on the work required. Utility companies frequently provide $75–$600 off in energy-efficient appliances and water heaters. You can also get immediate in-home rebates on intelligent upgrades like an Energy Star-rated refrigerator, washer, or dryer. ## 5. Use Fire-Resistant Building Materials For those homes located in wildfire-prone areas, using fire-resistant materials to insulate your home will be a priority. This includes cement boards, stucco, metal, or tempered glass. You can create a defensible space around your house by clearing combustible materials and vegetation, putting ember-resistant roof vents on, and incorporating gravel or rock into your landscape. All these measures ensure your climate-proof home is ready for unexpected fire events. Depending on where you live, neighborhood rebate programs can go a long way to pay for fire-resistant upgrades. In Cowichan Valley (BC), you can be eligible for a 50% rebate (up to $4,000) via FireSmart-approved improvements after an official assessment of your home. In the Regional District of Okanagan-Similkameen, you can claim up to $500 for the removal of combustible trash or for creating non-combustible zones around your home. Over in Banff (Alberta), residents can get $1,200 toward replacing wood-shingle roofs with fire-resistant materials, and $200 for removing nearby conifer trees—plus discounted sprinkler kits and a free FireSmart assessment. In Atlantic Canada, there is support through the Canadian Red Cross for upgrades such as Class A roofing or siding that is fire-rated, with reimbursements up to $1,500. ## 6. Improve Landscape Grading and Drainage Do you live in a flood-prone zone? Next, properly grade your yard to prevent waterlogging. In order to prevent water from collecting around your home, grade the land away from it. Your home's drainage can be improved with permeable pavers or French drains. Since they can help alleviate the effects of drought, you might also want to add rain barrels or cisterns to your "to-do" list of home upgrades. Many Canadian municipalities actively support rainwater management upgrades. For instance, Hamilton’s Rain Ready Rebate funds LID projects like permeable surfaces and rain gardens with up to $5,000 in incentives. In Ottawa’s priority retrofit areas, homeowners can get up to $5,000 back for projects including rain gardens, permeable paving, soakways, and downspout redirection. Guelph offers up to $2,000 based on rainwater storage capacity, while Calgary rebates $50 per rain barrel (up to three), and Thunder Bay offers a $625 rebate for rain garden installations through EcoSuperior. You may also like **[How to Prevent Basement Flooding During Heavy Rains?](https://urbantasker.com/blog/how-to-prevent-basement-flooding-during-heavy-rain)** ## 7. Install Solar Panels with Battery Backup The easiest way to reduce the environmental footprint on our planet is to **[install solar power panels](https://urbantasker.com/blog/is-it-worth-to-put-solar-panels-on-your-home-in-canada)** on your home. You'll limit grid electricity, leading to fewer carbon dioxide emissions. One possibility is to purchase the panels with a battery storage system by Tesla Powerwall or LG Chem. And you will have greater knowledge and sustainability in solar energy, depending on the situation. Panels with installation typically cost anywhere from $15,000 to $30,000+, depending on your home's size and energy use. When you add battery storage - a Tesla Powerwall, or LG Chem system - you can expect an additional $10,000-$20,000. The good news is that government rebates can cover a good chunk of that. Under Canada's Greener Homes program, you are going to be able to get rebates of up to $5,000 for panels and from $1,000 to $5,000 for storage, so the cost can be much lower to get started. The system will pay for itself over time in reduced energy bills and peace of mind during a power outage. ## 8. Install HVAC systems that use less energy. Variable temperature and humidity may not be supported by the heating, ventilation, and air conditioning (HVAC) systems in use today. You can improve if you were to use an energy-efficient HVAC system, along with thermostats to conserve energy. This modification would improve the air quality in your room as well. When operating for either heating or cooling, heat pumps operate more effectively than and less efficiently than heating systems in changing climates. For a climate-proof home, new HVAC solutions offer comfort throughout the year without paying more for electricity. If you are installing a heat pump or new energy-efficient HVAC system, it will cost in the range of $7,000 to $15,000.This cost depends on the type of system and the size of the home. Homeowners can receive a rebate of $4,000–$6,500 for installing heat pumps. With the provincial and utility rebates combined, you can receive $10,000. It can cut the upfront costs in half. Do have a look at **[Heat Pump vs Furnace - Are Heat Pumps Worth it?](https://urbantasker.com/blog/heat-pump-vs-furnace-are-heat-pumps-worth-it-benefits)** ## 9. Use Smart Home Monitoring and Alerts Technology can be a consistent partner in climate adaptability. Smart sensors will identify leaks, environmental changes, or threats such as smoke, carbon monoxide, and even mold before they become an issue. Home automation also includes all things remote that can monitor temperature, lighting, security, and so on; all of which could potentially and literally save your life in an emergency or while you have been away on vacation. The greatest possibilities for your living area can be unlocked with the right configuration and the ideal fusion of technological advancements. Smart home systems typically cost $200–$1,500, and many utilities offer rebates of $50–$125 on smart thermostats, making it easier to protect your home and save energy. A few suppliers also offer free installation programs to families who qualify. ## 10. Harvest and Reuse Rainwater Climate change will create water shortages in most regions. Rainwater harvesting systems are a simple method of saving water for toilet flushing or gardening. If you have good filter systems, rainwater can also be purified for drinking. You can reduce your dependence on municipal supply and prepare your house for drought by incorporating rain barrels, cisterns, and grey water systems. This can make you ahead of the home improvement journey by making every drop count. This system can cost you $500 to even more than $10000. Depending on size, rainwater systems can be eligible for rebates of $500–$2,000. Simple rain barrels have smaller incentives from the City of Toronto. Note: The costs and rebates we’ve shared in this blog are based on current information and may vary over time due to market trends, government policies or other influencing factors. ## How Rebates Can Actually Save You Money? In recent years, home improvements haven’t been cheap. When you hear about upgrading to solar panels or buying a new heat pump, the first thought that probably comes to mind is, “That’s going to cost a fortune.” And honestly, it can feel that way at first. But here’s where rebates step in and make a huge difference. You can consider it as a form of payback for choosing a more environmentally friendly option. So instead of paying the whole amount, you are getting some of your money back – in the right way. But every little bit counts. Consider solar panels. Let's say you are looking at a system that costs approximately $18,000. With the 30% federal solar tax credit, you knock off more than $5,000 immediately. Add in a state rebate of maybe $2,000 and a utility bonus of $1,000, and suddenly you’re not staring at $18k anymore—it’s closer to $9,600. And this isn't where it ends either. Now that the panels are installed, your electricity bill may be reduced by roughly $1,000 - $1,200 every year. With that knowledge in mind, if you run the numbers, you will find your system is paid off in under a decade. After ten years, you'll save a lot of money. The same holds true for little improvements like putting in more insulation or switching to energy-efficient appliances. Your upfront payment lowers due to rebates; from that moment on, you’re saving money every month on your utility bills. For families with moderate or low income, these programs can be even more generous—sometimes covering half the cost, or in a few cases, the entire project. That means the big “what if I can’t afford this?” worry doesn’t have to hold you back. So yes, rebates don’t have to be a boring policy detail; they are one of the reasons plenty of folks are finally able to make the jump into greener and more expensive homes without putting a dent in their pocket. ### The Need of Climate-proof Homes Climate change is an urgent and massive concern all over the globe. Ranging from floods to heat waves, the climate has undergone a drastic change in the past 10-20 years. Global warming is impacting the lives of human beings to a large extent. The number of warmer days of the year may very well be our new norm. Climate change is taking place more rapidly than ever before. Climate-proof houses matter if you don't want to be a victim of drought and flooding. You can contribute to lowering climate change by putting solar panels on your house, having a proper drainage system installed, and utilizing materials appropriately during renovations. By using **[eco-friendly solutions](https://urbantasker.com/blog/eco-friendly-home-services-sustainable-upgrades-for-canadian-homeowners)**, you are not just saving energy, you are actively climate-proofing your home against extreme weather and rising temperatures What are you waiting for? It is essential to integrate all the precautionary measures in your home until the situation gets out of our hands. ## The Future Starts with a Climate-Proof Home **Your house is your first line of defence** against climate threats. While there are many ways to update and change your house to defend against climate threats, often the most difficult task is prioritizing and accomplishing your goals in a logical sequence. Throwing in some weather-proof windows is an easy beginning; if you just continue learning and practicing, you'll be halfway to a climate-proof house! Opt for dwelling in a climate-resilient house and shield yourself from adverse weather conditions in the future. You are also safeguarding your house, your investment, and your share to facilitate a more sustainable and greener tomorrow. **What is the best way to climate-proof your home?** Let us know in the comments. Prevention now will actually save you more in the long run than repairs and disruptions later, as it appears the level of uncertainty in our world has only grown. And if you're investing in a climate-resilient house, not only does it protect you, but it gives you the whole package of peace of mind. What steps have you taken to climate proof your home in the best way? Share your ideas in the comments. Being cautious now will ultimately be less expensive than making repairs and interruptions later, especially since uncertainty in our world seems to be increasing. Therefore, if you are investing in a climate-resilient home, it is not only providing you shelter but also a complete peace of mind. Want to make your home climate proof? UrbanTasker helps you find skilled pros to weatherproof, insulate, and upgrade your home. **[Post Your Task](https://urbantasker.com/tasks/create)** and start getting free quotes from local service providers.

Eco-Friendly Home Services: 5 Sustainable Choices for Canadian Homeowners

**Eco-friendly Home Services** are a fairly smart decision when it comes to homes and businesses in Canada, a country whose climate and energy costs are changing rapidly. Embracing sustainable solutions not only helps reduce environmental impact but also enhances energy efficiency, lowers utility bills, and adds long-term value to your property. In today’s evolving landscape, going green isn’t just a trend—it’s a smart investment in a cleaner, more resilient future. It’s a thoughtful, forward-looking approach to modern living. ## Why Eco-friendly Home Services are Crucial? From **energy-efficient upgrades** to **green cleaning solutions**, eco-friendly home services are not only better for the planet—they can also reduce long-term costs and improve indoor air quality. Whether you're renovating your home, scheduling regular maintenance, or simply looking to adopt a greener lifestyle, making mindful, eco-conscious decisions can have a lasting impact. The best part, eco-friendly home services not only make your home healthier and greener but help to **reduce your energy bills** too. Want to reduce carbon emissions? Wish to breathe cleaner air? Get rid of that lingering home stink? Or just make a smart investment in your space? Here are some trending green services that do it all—sustainably. ## Eco-Friendly Home Services Let's go through some of the doable, eco-friendly tasks you can apply at your home. This includes both practical and planet-friendly options for the modern Canadian homeowner. ## 1. Clean Green It is good at home, and it is good for the planet. Common cleaning agents applied by regular cleaning firms release volatile organic compounds (VOCs) and artificial fragrances that contaminate more than just our living environment in terms of air quality. Green cleaning abandons these to more earth-friendly, biodegradable alternatives that are plant-based. The best of what you can get in hiring green cleaners: - **Eco-friendly products:** Make use of plant-based cleaners, disinfectant scents carried by essential oils, and eco-certifiers . - **Green cleaning products:** Use vacuum cleaners with HEPA filters to collect fine dust, and use microfiber cloths to reduce waste. - **Waste reduction:** Lessen the usage of plastic through the utilization of refillable spray bottles and eco-packaging. ## 2. Energy-Efficient Appliances & Heat Pumps Heating, ventilation, and air conditioning or HVAC systems, as well as appliances, use a massive amount of energy at home as much as 60 percent in colder climates. Replacing worn-out or ineffective equipment with ENERGY STAR appliances and heat pumps produces long-term savings and a long-term ecological life. Smarter, Greener Living is an opportunity to seek, hear, and feel. The Smart Grid will make a difference with its new and improved energy-efficient appliances and heat pumps. ### Green Appliance Makeover - **Heat-pump clothes dryers:** You can recover the amount of hot air using the principles of heat exchange and reduce the energy consumption by up to 50 percent. - **Induction cooktops:** Induction cooktops are quick and efficient, with accident-free stovetops. - **Cold-climate air-source heat pumps:** These heat pumps offer both heating and cooling with reduced GHG emissions and low operational expenses. You may also like to know **[Heat Pump vs. Furnace - Are Heat Pumps worth it?](https://urbantasker.com/blog/heat-pump-vs-furnace-are-heat-pumps-worth-it-benefits)** ## 3. Eco-Friendly Pest Control To get rid of pests, people usually use chemical products as synthetic pesticides, which harm human health, domesticated animals, and wild animals. Integrated Pest Management (IPM), eco-friendly control, employs containment, observation, and low-toxicity techniques. Some of the popular Eco-centered tactics include: - **Barrier Methods:** To keep out the pests, mend cracks and fissures - **Natural Repellents:** Use plant oils, diatomaceous earth, and pheromone traps. - **Good Bugs:** Equalize the pests by fragmenting ladybugs or predatory mites. - **Organic Sprays:** Use neem oil or soaps instead of broad-spectrum pesticides. You may also like **[Best Home Improvement Blogs to Follow in Canada](https://urbantasker.com/blog/best-home-improvement-blogs-canada-renovation-niche-blog)** ## 4. Sustainable Landscapes & Pollinator Friendly Gardens Turfgrass does not promote biodiversity as it is resource-intensive. Sustainable landscaping make use of native landscaping, xeriscaping, and pollinator gardens, which use less water, chemicals, and maintenance using gas-powered tools. Common green landscaping job covers: - **Select Drought-tolerant Plants:** Choose drought-tolerant plants and use rainwater as a source of irrigation through xeriscaping and rain gardens. - **Native Shrubs and Flowers:** These are flower species that love bees, such as milkweeds and wild bergamot. - **Edible Landscaping:** Combining ornamental bushes of fruit varieties and herbs is very helpful. - **Magic Lawn Care:** No use of synthetic fertilizer; instead, use organic fertilizer, compost, and good critters. You may also like to explore **[All Season Lawn Care Tips for Canadian Homeowners - A Complete Guide](https://urbantasker.com/blog/all-season-lawn-care-tips-canada-spring-summer-ideas)** ## 5. Energy Audit of Homes & Insulation Retrofits A professional energy audit lets you know whether your home is losing heat or needs insulation. Make sure to get an energy audit done before spending money on big tasks like window replacement or setting up solar panels. Required points in auditing are: - **IR Extended Imaging:** Sets cold holes in the walls and ceilings. - **Blower-door Test:** Gives you the ability to sense drafts, together with points of air leakag - **Evaluation of Ventilation:** This helps to prevent moisture and energy loss. - **Windows and Door Scrutiny:** It rates current U-values and makes suggestions for improvement. ## Sustainable Home Upgrades Made Easy with Intelligent Tools Going green in your home is daunting and uneasy to accomplish, yet new websites, apps, and digital tools are helping users go green with less trouble, greater transparency, and significantly more accessibility. Obtaining a green cleaning team or undertaking an entire energy retrofit is no longer a time-consuming process of calling in companies or comparatively going through websites site by site. ## How Platforms like UrbanTasker Support Sustainable Home Services? Home services platforms like **[UrbanTasker](https://urbantasker.com/)** play a growing role in promoting eco-friendly living by making sustainable services more accessible and convenient for homeowners. ## 1. Promoting Green Service Providers Home services platforms often partner with eco-conscious professionals who use non-toxic, biodegradable products (in cleaning, pest control, lawn care). Providers offering Energy-efficient equipment (in HVAC, lighting, and plumbing tasks) and using sustainable materials (in renovations and repairs) contribute to a greener environment. By listing these providers, platforms give eco-friendly businesses visibility and help consumers make smart greener choices. ## 2. Encouraging Smart Home Upgrades Many platforms promote installation of smart thermostats, solar panel installations and energy-efficient window and insulation upgrades These not only reduce utility bills but also cut down on carbon emissions—making homes more energy-resilient. ## 3. Reinforcing Local Business and Environmentally Friendly Initiatives These sites tend to promote local businesses who are focusing on eco-friendly practices, so it is easy to help the community grow and benefit your house at the same time. ## 4. Reducing Transportation Emissions With geo-targeted algorithms, online platforms connect users with local professionals, reducing the need for long-distance travel. This helps in lowering fuel consumption, carbon footprint and traffic congestion. ## 5. Digitization = Less Paper Waste Home services platforms operate digitally! Digital quotes and online bookings minimizes paperwork and promotes paperless, sustainable transactions. ## 6. User Awareness & Education Many platforms share blogs, tips, and guides on reducing energy consumption. We at UrbanTasker share regular tips on eco-friendly maintenance habits and sustainable renovation ideas. This helps homeowners adopt a greener lifestyle over time. Platforms like UrbanTasker aren’t just about convenience. They're building a bridge between homeowners and eco-smart professionals—one task at a time. Whether it’s a green clean-up or an energy-saving upgrade, you’re one click closer to a more sustainable home. ### Sustainable Living Starts at Home Eco-friendly home services help homeowners minimize their carbon footprints, improve indoor health, reduce carbon emissions, and support green businesses. It’s now more important than ever to **[climate-proof your home](https://urbantasker.com/blog/climate-proof-your-home-upgrades-for-climate-resistant-house)**. Hope this quick guide helped you discover simple and sustainable choices to make your Canadian home more eco-friendly and future-ready. As a Canadian homeowner, every sustainable choice you make—no matter how small—adds up to a cleaner, healthier environment for generations to come. Whether you're switching to green cleaning products, installing energy-efficient systems, or simply hiring service providers who share your eco-values, you're contributing to real change. Are you someone who believes in greener choices and smarter living? **[Post Your First Eco-Friendly Task Now](https://urbantasker.com/tasks/create)**, and local pros will bring the sustainable upgrade right to your doorstep.

Will a New Furnace/ HVAC System Add Value to My Home?

When we decide to sell our home then we always try every best possible ways that can increase the value of property.Because at this time every little detail counts, from the curb appeal to the kitchen, everything needs to be in tip-top shape to get top dollar. However many people have doubt that whether installing a new HVAC system will add value to their or not? So, if you also have the confusion then don't worry because today you will be finding the answer to this question here. Let's find it out! ## Will a New Furnace or Installing a New HVAC System Add Value to Your Home? Yes, adding a new furnace or **[HVAC system](https://urbantasker.com/article/why-are-hvac-systems-so-expensive)** can definitely make your home more valuable. Because it offers a lot of benefits that buyers will surely find more attractive and may pay you higher than it's actual price. So, let's look at these benefits that comes with installing a new HVAC system. ## 1. Save Money On Monthly Bills: Newer furnace and HVAC systems are designed to be more energy-efficient compared to older models and save money on your monthly energy bills. They utilize advanced technology and improved insulation, resulting in reduced energy consumption. This means lower energy bills for homeowners, making properties more attractive to potential buyers looking for energy-efficient homes. The long-term savings and environmental benefits of an energy-efficient system can significantly increase the value of your home. You may also like to know **[Are HVAC Quotes negotiable?](https://urbantasker.com/article/are-hvac-quotes-negotiable)** ## 2. Enhanced Comfort: A new furnace or HVAC system can greatly improve the comfort levels within your home. Modern systems provide more precise temperature control, ensuring even distribution of heat or cool air throughout the house. This eliminates cold or hot spots, creating a comfortable living environment. Homebuyers value comfort, and a well-maintained HVAC system can be a major selling point, potentially increasing the desirability and value of your property. Looking to save on your energy bill, **[Can Installing a Smart Thermostat Save You Money?](https://urbantasker.com/blog/can-installing-smart-thermostat-save-you-money)** ## 3. Improved Indoor Air Quality: When you upgrade to a new HVAC system, it usually means you have better air filters. These systems effectively capture and remove dust, allergens and other airborne particles, improving indoor air quality. This is especially appealing to buyers who prioritize a healthy living environment, making your home more attractive and potentially increasing its value. You may also like to learn about **[Heat Pump vs. Furnace - Are Heat Pumps worth it?](https://urbantasker.com/blog/heat-pump-vs-furnace-are-heat-pumps-worth-it-benefits)** ## 4. Longer Lifespan and Warranty: New HVAC systems come with extended warranties, providing buyers with peace of mind. The warranty coverage offers protection against unexpected **[furnace repair costs](https://urbantasker.com/blog/when-should-i-replace-my-furnace-signs-to-look-for)**, making the property more appealing and reducing the perceived risk for potential buyers. Additionally, newer systems generally have a longer lifespan, meaning buyers won't have to worry about immediate replacements or repairs. This factor adds value to your home by presenting it as a well-maintained property with a reliable HVAC system. You may also like to know [What is Cost of New Furnace in Ontario, Canada?](https://urbantasker.com/blog/what-is-cost-of-new-furnace-in-ontario-canada) ## How Much Value Can a New HVAC System Add? The truth is, adding a new HVAC system will definitely add value to your home. But remember that the value a system adds to your home depends on several factors, including the age and performance of your current system, the weather in your area, and the overall condition of your home. However, in general, a new HVAC system can add 5-10% of the cost of the system to the value of your home. For example, if you install a new $10,000 HVAC system, you can expect to add $500 to $1,000 or more to the value of your home. You may also like to learn [When is the Best Time to Insulate Your Attic?](https://urbantasker.com/blog/when-is-best-time-to-insulate-your-attic) ## When Should You Replace Your HVAC System? Your HVAC system is one of the most important parts of your home because it maintains a comfortable environment in your home. However, if your HVAC system is not working properly or the system is old, it can increase your energy bills and it may be time to replace it. Now the question is, when should you replace your HVAC system? You must also know **[What is the average lifespan of a furnace?](https://urbantasker.com/article/what-is-typical-lifespan-of-furnace)** Ideally, you should replace your HVAC system every 10 to 15 years. But there are other factors to consider. For example, if your current system is not very efficient, it may be worth replacing, even if it is not that old. And if you live in a place with extreme temperatures, you may need to replace your system more often. Replacing your HVAC system can be a big investment, but it's worth it in the long run. The new system is more efficient, saving you money on your energy bills. It is also more convenient and can even add value to your home. You may like to discover **[How Much Should I Budget for Home Maintenance and Repairs in Canada?](https://urbantasker.com/blog/how-much-should-i-budget-for-home-maintenance-repairs-in-canada)** ## How to select a New HVAC System? ## Here are some more tips for choosing a new HVAC system. * You can get multiple estimates from different contractors to make sure you get the best price for your system. **[UrbanTasker](https://urbantasker.com/)** is there to provide you with FREE quotes from multiple HVAC technicians. * You can also confirm the efficiency of the system, as more efficient systems will save you more money on your energy bills. * Make sure the system is the right size for your home, as a system that is too small will not be able to keep your home comfortable, while a system that is too large will be inefficient. * Finally, choose the [best furnace brand](https://urbantasker.com/blog/best-furnace-brands-in-canada-top-list) or HVAC system with a good warranty to protect you against system failures. Are you Hiring an HVAC Contractor/ Technician? Learn about [What to Ask and Look for while hiring an HVAC Contractor/ Technician?](https://urbantasker.com/blog/hiring-hvac-contractor-technician-what-to-ask-look-for) By following these tips, you can choose a new HVAC system that will increase the value of your home and make it more comfortable for you and your family.

How Much Should it Cost to Paint the Outside of House in Canada? Exterior Painting Pricing

Planning to refresh your home's curb appeal? Painting the exterior of your house is a smart and budget-friendly way to instantly boost property value and protect your investment from harsh Canadian weather. If you're wondering, How much does it cost to paint the outside of a house in Canada? What is the average cost of exterior painting job in Canada? We have answers to your queries and ways to save money on your next home painting project. Homeowners across Canada ask this question every year - and while the answer depends on several factors, we’ve gathered everything you need to know. Plus, platforms like **UrbanTasker** can connect you with **[top-rated painters in your area](https://urbantasker.com/painter)**, helping you save time, compare quotes, and hire with confidence. ## What is the Average Cost to Paint a House Exterior in Canada? The average cost to paint the outside of a house in Canada typically ranges from: - $2,500 to $6,000 for a standard two-storey home (1,500–2,500 sq ft) - $1,500 to $3,000 for a smaller bungalow or townhouse - $5,000 to $10,000+ for larger homes or custom exteriors These estimates include labour, paint, and prep work. But don’t worry - we’ll help you break it all down. ## Key Factors That Impact the Exterior Painting Cost Wondering why your neighbour paid half of what your quote says? Here are a few reasons prices can swing: ### 1. Home Size and Design The bigger and more complex your home’s structure, the higher the cost. Homes with multiple storeys, high peaks, or architectural features take more time and equipment. But even a smaller home with complex shapes, dormers, or tricky angles can cost more due to the time it takes. ### 2. Type of Exterior Surface Different materials require different prep and painting techniques: - Wood siding needs sanding and sealing - Stucco absorbs more paint and needs special rollers - Brick may require priming and sealing - Vinyl requires the right type of paint to adhere properly ### 3. Surface Preparation Peeling paint? Cracks? Mold or mildew? All of these require proper cleaning, repairs, and priming—adding time and cost to the job. If your house needs power washing, scraping off old paint, caulking, or repairs to wood siding, expect to pay more. Prep work can take as long—or longer—than the actual painting. ### 4. Paint Quality and Quantity You get what you pay for with paint. **[Premium exterior paint](https://urbantasker.com/blog/beautitone-paint-reviews-canadian-made-paints)** costs $60–$90 per gallon but can last up to 10 years. Cheaper paint may save you money and you can get the starting range around $40 per gallon. But, they may require frequent touch-ups. However, a high-quality, weather-resistant paints cost more, but they last longer - especially in harsh Canadian climates. ### 5. Labour and Location Labour is a significant portion of the cost. Based on where you live, hourly rates for professional painters can range from $35 to $65 per hour. Painters in urban cities like Toronto, Vancouver, or Calgary come with higher price tags compared to smaller towns and may often charge more due to demand and cost of living. You may also like to explore **[The Ultimate Basement Renovation Checklist Canada ](https://urbantasker.com/blog/ultimate-basement-renovation-checklist-canada)** ## DIY vs. Hiring a Pro Painter: What’s Worth It? You might be thinking: Should You Paint It Yourself? Why not just do it myself and save money? While DIY painting can cost you less upfront (mostly just the price of paint and tools), it comes with its own set of challenges. Exterior painting involves ladders, safety gear, weather planning, and a lot of time and physical effort. If you're not experienced, mistakes can lead to peeling, cracking, or water damage down the line. Painting the exterior of a house sounds tempting for DIY lovers, but it’s no small job. Consider: - Safety concerns (especially with ladders or high peaks) - Weather dependency - Prep work and equipment needs Hiring a professional may cost more, but you’ll benefit from: - Expert prep work - Proper safety practices - Efficient turnaround times - Warranty or guarantee on workmanship You might save on labour, but a DIY job can end up costing more if mistakes lead to premature peeling or water damage. Hiring a professional ensures durability, safety, and a polished finish. Prefer having a **[set budget for home maintenance](https://urbantasker.com/blog/how-much-should-i-budget-for-home-maintenance-repairs-in-canada)** like painting, repairs, and other renovations. ## How to Save Money on Exterior Painting? Painting doesn’t have to break the bank! Try these cost-cutting strategies: ### 1. Request Multiple Quotes Don’t go with the first quote you receive. Use UrbanTasker to **[get multiple quotes](https://urbantasker.com/tasks/create)** and connect with skilled painters in your area. ### 2. Do Some Prep Work Yourself You can save hundreds by power washing your exterior or removing loose paint beforehand (only if you’re confident doing it safely). ### 3. Book During Off-Peak Months Spring and summer are busy seasons. Scheduling your job in early fall or late spring can lower costs. ### 4. Use Mid-Range Paints Wisely Choose a paint with good weather resistance - you don’t have to go top-tier, but avoid the cheapest option that might fade or peel quickly. ### 5. Bundle Jobs If you’re considering painting the interior too, ask for a bundle discount - many painters will offer one if they're doing more work in one trip. ## Exterior Painting: Is It Worth the Investment? Absolutely. A well-done exterior paint job: - Boosts curb appeal - Adds resale value - Protects your home from weather damage Painting the exterior of your house is more than just a cosmetic upgrade - it’s a protective shield against Canada’s diverse and sometimes harsh weather conditions. Whether you go all out with high-end paint and a premium crew or take the budget-conscious route with some DIY help, one thing is clear: it pays to plan ahead. ## Hiring Expert Painters Don’t just ask "How much does it cost to paint a house?" ask, "What’s the best way to protect my home and add value for years to come?" You’ll thank yourself every time you pull into the driveway and admire your fresh, vibrant exterior. And remember, hiring the right professional makes all the difference. That’s where **UrbanTasker** comes in, connecting you with skilled painting experts in your area who know exactly how to handle Canadian homes - and Canadian weather! What are you waiting for? Go ahead and give your home a fresh look!

Ice Dam Removal and Prevention: 5 Expert Tips for a Safer Home

Canadian winters have a quiet way of causing damage. Snow piles up on the roof, temperatures swing between freezing and thawing, and everything looks peaceful from the outside. But up there, just under the snowline, icedams can start forming. If you’ve ever seen thick ridges of ice forming along your roof edges or gutters, you’ve already seen an ice dam. And while they might look harmless, ice dams are one of the most common causes of winter home damage in Canada. They can lead to leaks, mold, insulation damage, ceiling stains, warped walls, and costly repairs — all without any dramatic warning signs. The good news? Ice dams are preventable. And when they do appear, safe removal matters just as much as prevention. Here’s how you can protect your home with smart, practical steps that actually work in real Canadian winter conditions. ## What Causes Ice Dams? Heat leaving a house can travel up into the attic, thereby warming the roof. When melted snow moves towards these spots, it freezes again because those areas stay colder - especially near edges and gutters. Layer after layer, that freezing builds until it forms a hard, unyielding sheet of ice. When the block takes shape, melted snow lacks an exit. Water pools behind shingles, trickling into insulation, walls, ceilings, along with surrounding areas. What happens near ground level matters most when cold temperatures stick around. Water seeping into cracks do not need extreme weather to cause trouble. In places like Canada, seasons of constant freezing followed by thawing weaken foundations. Snow piled high during months of dark days adds pressure on older walls. Winters stretching long push moisture deeper into walls of older homes. Even small shifts in how warm and cool roof surfaces stay can trigger damage over time. ## Practical Ice Dam Removal and Prevention Tips for Winter Here are some useful tips to prevent ice dams in your house: ## 1. Improve Attic Insulation (Your First Line of Defense) If your attic isn’t properly insulated, heat rises straight into your roof — and that’s where the problem begins. **[Proper attic insulation](https://urbantasker.com/blog/when-is-best-time-to-insulate-your-attic)** keeps warm air inside your home, not trapped under your roof. This keeps the roof surface colder and prevents uneven melting. Here's what helps: - Upgrading attic insulation - Sealing attic air leaks - Insulating attic hatches and access doors - Checking insulation coverage in corners and edges This steps prevent ice dams while saving energy simultaneously - a gain without losing anything, even through harsh Canadian winters. ## 2. Seal Air Leaks Before Heat Escapes Warmth slips through tiny openings even when insulation is present. Usually, it comes from light switches, bathroom vents, wiring holes, or the attic. Small cracks show up as warm patches on the roof. Where frost fades fastest, that’s the place. Here's what might help: - Seal ceiling gaps and penetrations - Weather-strip attic doors - Seal duct joints - Check bathroom and kitchen vent connections This creates a consistent roof temperature and stops uneven melting, which is what leads to ice dams in the first place. ## 3. Improve Roof and Attic Ventilation Proper ventilation keeps cold air circulating in your attic, balancing temperatures and preventing warm pockets. Without ventilation, heat builds up — even in well-insulated homes. Key ventilation elements include: - Soffit vents - Ridge vents - Roof vents - Clear airflow pathways A well-ventilated attic helps keep your roof surface cold and stable — which stops melt-refreeze cycles from forming ice dams. ## 4. Safe Ice Dam Removal If ice dams have already formed, removal needs to be handled carefully. ### Never do this: - Chip ice with axes, hammers, or shovels - Climb onto icy roofs - Pour hot water on frozen areas - Break shingles to access ice These methods damage roofing materials and create serious safety risks. ### Safer removal options: - Professional steam removal services - Roof heating cables (installed properly) - Controlled ice melt products - Professional winter roof services Steam removal is the safest and most effective professional solution — it removes ice without damaging shingles or gutters. You may also like: **[What to Inspect after a Heavy Snow and Ice Storm? Your Post Winter Storm Checklist Canada](https://urbantasker.com/blog/what-to-inspect-after-heavy-snow-ice-storm-winter-checklist-canada)** ## 5. Prevent Snow Buildup Before Ice Forms Snow management plays a big role in prevention. Here are some smart winter habits: - Use roof rakes after heavy snowfall - Clear roof edges regularly - Keep gutters clean before winter - Maintain proper drainage paths - Watch for early signs of ice buildup Reducing snow accumulation reduces meltwater volume — which directly lowers ice dam risk. ## Signs You May Already Have Ice Dam Damage Sometimes the damage shows up before the ice does. Watch for: - Ceiling stains - Peeling paint - Damp insulation - Moldy attic smells - Dripping walls - Frozen gutters - Icicles forming only in certain roof sections These are early warning signs that water is backing up under your roof. ## Why Prevention Is Always Cheaper Than Repair? Ice dam damage repairs in Canada can easily run into thousands of dollars - from insulation replacement and drywall repairs to mold remediation and roof restoration. Prevention costs far less than repairs. Simple upgrades in insulation, sealing, and ventilation protect your home year after year. It’s not just about stopping ice, it’s about protecting your structure, your indoor air quality, and your long-term property value. ### Protecting Your Home from Ice Dam Damage Ice dams starts quietly, without prior warning. Damage might stick around far longer than expected. Hidden problems often cause long-term effects. Repair work keeps coming back instead of being fixed once. Heat stays better when gaps are closed, airflow keeps things clear, and materials block drafts. Instead of blaming winter, fix insulation issues, leaks, and handle snow-related problems. By following these steps, you will create a system that will work best for Canadian winters. A safer home isn’t about reacting to winter damage; it’s about preparing before the damage ever starts. When ice is already building up, reaching out to professionals may stop further deterioration. Home service platforms such as [UrbanTasker](https://urbantasker.com/) helps you connect to nearby experts who handle ice dam removal.Just post your task and receive multiple quotes within minutes.

What are TaskRabbit alternatives in Canada?

When it comes to home services then Task Rabbit is the one that connects you with the right service provider but it's no longer the only one now. There are many alerenatives available these days and one of the best alternative is **Urban Tasker**. So, let's have a look at the best alternative to the TaskRabit and also we will see what makes it the number one alternative in Canada. ## What are TaskRabbit alternatives in Canada? **UrbanTasker** is the number one alternative to the TaskRabbit, that connects homeowners with skilled professionals for a wide range of home services. So, if you need help with plumbing, electrical work, carpentry, or other tasks, UrbanTasker is the platform that helps you to choose the right service. ## How does UrbanTasker work? Using UrbanTasker is simple. First, you post your task on the platform, specifying your requirements. Then, you'll start receiving quotes from professional service providers. You can review these quotes, select the best fit for your needs, and proceed with the chosen professional to complete your task. ## Why is UrbanTasker considered the No. 1 alternative to TaskRabbit? **[UrbanTasker](https://urbantasker.com/) offers several advantages that make it a top choice:** **1. Convenience**: UrbanTasker provides a user-friendly experience, making it easy to connect with reliable service providers without the hassle of extensive research or multiple phone calls. **2. High-Quality Professionals**: UrbanTasker's network consists of experienced and trustworthy professionals. Each provider goes through a thorough vetting process to ensure their skills and reliability. **3. Transparent Pricing**: With UrbanTasker, you have the opportunity to discuss and negotiate the price directly with the service provider. This allows for better control over your budget and ensures a fair agreement. **4. Customer Satisfaction**: UrbanTasker has an impressive customer satisfaction rate, with 99% of users giving it a 5-star rating. You can trust that your home service needs will be met with professionalism and expertise. ## How does UrbanTasker benefit homeowners? **UrbanTasker offers several benefits to homeowners in Canada:** **1. Free Quotes**: By using UrbanTasker, you can receive free quotes from expert professionals. This helps you make informed decisions and choose the best provider for your specific requirements. **2. Real-time Response**: Once you post your task on UrbanTasker, you'll start receiving quotes promptly. This eliminates the need to wait for service providers to get back to you, ensuring a faster process. **3. Effective Communication**: UrbanTasker allows direct communication with the chosen professional. This enables thorough discussions about your task, ensuring that both parties are on the same page. ## How does UrbanTasker support service providers? UrbanTasker is not just beneficial for homeowners, but also for service providers looking to expand their business and boost their revenue. By joining UrbanTasker, service providers gain access to a steady stream of new leads in their specific service areas. This means they can focus on the regions where they excel, connecting with homeowners who truly require their expertise. As a result, service providers can engage in more effective and meaningful collaborations, delivering their services to those who genuinely need them. ## TaskRabbit alternatives in Canada TaskRabbit has been a popular choice for connecting homeowners with service providers, it's no longer the only player in the market. There are several alternatives available in Canada, like Airtaske, Jiffy, Handy that offers their own unique features and advantages. However, when it comes to the number one alternative, UrbanTasker shines as the top choice.

Made with in Canada
© 2026, UrbanTasker Technologies Inc. All rights reserved.

When you visit or interact with our sites, services or tools, we or our authorised service providers may use cookies for storing information to help provide you with a better, faster and safer experience and for marketing purposes.