Sizzling Trends: Top 5 Outdoor Living Projects Homeowners Love This Summer Season

Last Updated: 
Sizzling Trends: Top 5 Outdoor Living Projects Homeowners Love This Summer Season

Outdoor living projects are rapidly gaining popularity in Canadian homes. If you’ve lived through a Canadian winter, you know what joy summer brings to everyone. It’s not just another season, it’s a feeling! After months of grey skies and bitter winds, the sun brings back joy and colours. It’s no wonder that so many Canadians are interested in Outdoor Living Projects to make every summer memorable.

Across Canada, from Halifax to Vancouver, homeowners have been thinking outside the box about their outdoor spaces lately. A lawn and a BBQ just don’t constitute everything anymore. This summer season there’s so much more. You can explore the entire backyard oasis, featuring outdoor kitchens, cozy fire nooks, and more. Whether for family time, hosting friends, or simply escaping beneath the open sky, outdoor living has taken centre stage.

Top 5 Outdoor Living Projects Homeowners are Embracing This Summer

If you are wondering what projects are trending right now, here are best outdoor upgrades that Canadians are absolutely loving this summer.

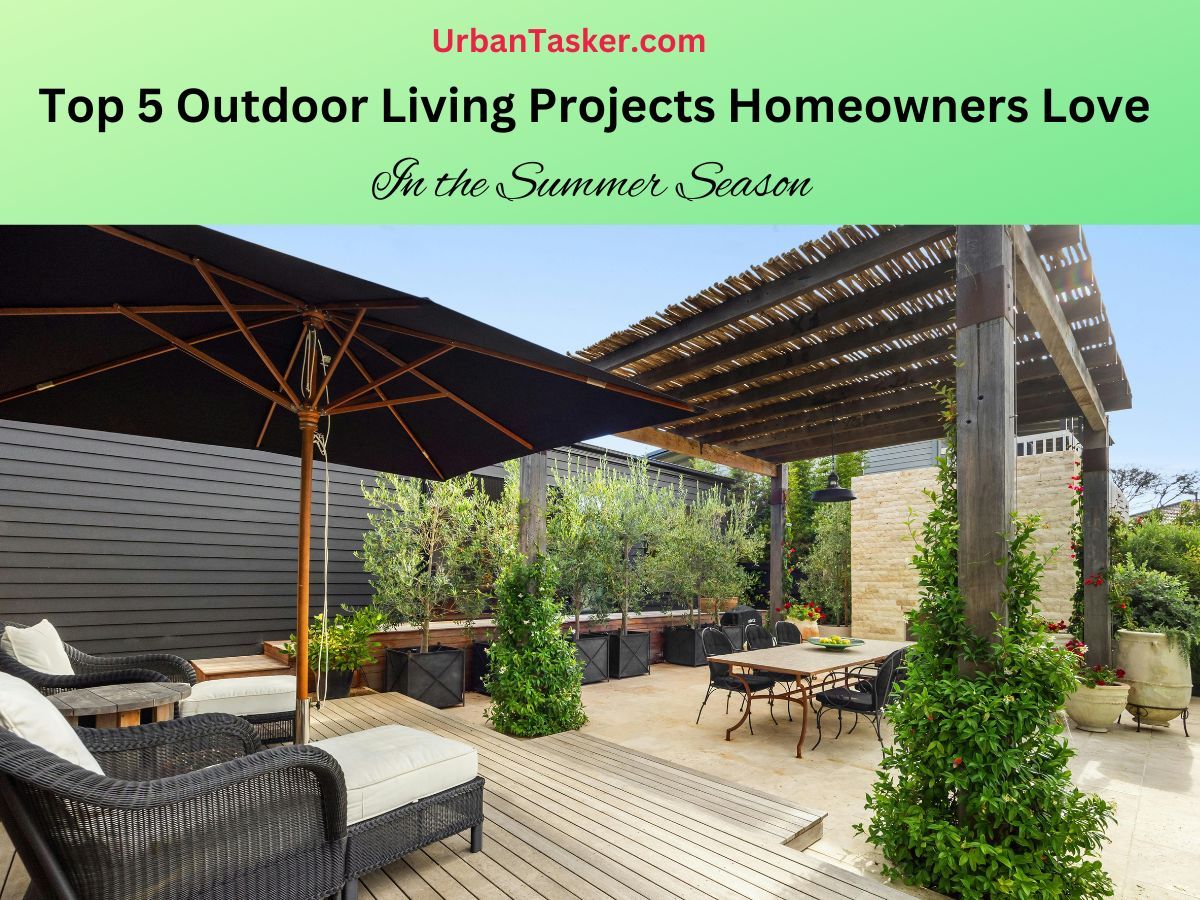
1. The Mighty Deck or Patio

Let’s start with the most popular upgrade, the deck or patio. It's the base for nearly everything that occurs outside during summer. From relaxed breakfasts to home dinners, from afternoon sunbathing to wine under the stars, it all occurs here.

Most people are forsaking plain wooden platforms for something sleeker and a hassle-free experience. Composite decking, contemporary railings, and integrated lighting. These little changes makes a huge difference. Even balconies are being dressed up with comfortable patio furniture and outdoor mats to create a wholesome experience.

It's cozy, versatile, and instantly transforms your backyard into a place where you'll want to hang around. And, it adds real value to your house.

2. Outdoor Kitchens & Dining Spaces

Let’s face it, no one wants to be stuck inside cooking while everyone else is enjoying the backyard. That’s probably why outdoor kitchens are having a moment.

We’re not just talking about a basic grill. Some homeowners are adding prep counters, storage cabinets, fridges, and even pizza ovens. And when paired with a shaded dining area, you have basically got your own backyard restaurant. It’s perfect for hosting, but also makes weeknight dinners way more enjoyable.

The best part is that outdoor setups keep the heat and mess out of the kitchen and bring people together around food.

3. Pergolas & Gazebos

Occasionally, just a touch of structure is all you require to elevate your yard. Literally. Pergolas and gazebos are everywhere this summer for all the right reasons. It is one of the most popular outdoor living projects in Canada.

These structures provide just enough shade and aesthetics. It can be coupled with some windblown curtains, hanging lights, or cascading vines, and you've got an area that feels like a pleasant, warm, and secluded outdoor space, essentially an outdoor living room!

If bugs are troubling you, screened gazebos can be your complete lifesaver! It gives shape to your outdoor layout, protects you from the sun (or the occasional drizzle), and makes the space feel “complete.”

You may also like to know How much does it cost to install Gazebo in Canada?

4. Gardens That Go Beyond Pretty

You’d be surprised how many people have picked up gardening over the last few years. But this summer, the outdoor living project is all about more than flowers. People are gardening with a purpose now: they build raised beds for veggies, herbs for cooking, and select flowers that support native pollinators.

Others do it because it's green and the serenity of working with something alive. A garden provides you with something tangible to care for, and it repays you with beauty, food, and peace of mind. There is nothing like a salad from the backyard!

You may also have a look at All Season Lawn Care Tips for Canadian Homeowners - A Complete Guide

5. Firepits & Fire Features

Canadian evenings can cool off quickly, even in July. That’s why firepits and other fire features have become must-haves.

Some folks go for a classic wood-burning pit, while others prefer the convenience of propane fire tables. Either way, it adds instant atmosphere. Light the fire, pull up some chairs, and the conversation flows.

Whether you’re roasting marshmallows with the kids or sipping wine with friends, a fire just makes everything feel a bit more magical. It helps stretch the season and the night a little longer. Who wouldn’t want to hold onto summer just a bit more?

Also, go through our detailed post on Hidden Costs of Home Renovations in Canada: What Nobody Tells You?

Why Outdoor Living Means More This Year?

Outdoor living projects are gaining popularity for all the good reasons. Perhaps it's the long winters or the growing need to unwind and unplug. Or maybe, after the last two years of not knowing what the future held, it is exceptionally obvious how valuable it is to enjoy the little things in life, like a warm sunny afternoon spent in the back yard.

Whatever the motivation, Canadians are spending time, effort, and creativity in their backyards. And the best part of all is, you don't have to do it all at once. Even making a minimal change in your outdoor area, like some new plants, a great reading armchair, or some fairy lights, can dramatically alter how you feel about your space.

While you’re upgrading your outdoor spaces, don’t forget that every season brings its own set of challenges — from scorching heat to sudden rain or snow. Staying on top of your seasonal home maintenance tasks ensures your new outdoor setup stays beautiful and functional all year round.

Not sure where to start with your outdoor upgrade? UrbanTasker makes it easy to find skilled local pros who can bring your backyard dreams to life.

Outdoor Living Projects - Summer Trends to Follow

Outdoor living projects have to be at the top of your home renovation to-do list. Why not join the party if you can? If you're constructing a deck, installing a garden, or hanging a hammock between two trees, the idea is the same: build a place that you would want to visit. A place to rest, reconnect, and do what you love!

These projects can turn your home into a serenity abode. The transformation not only adds beauty but also the price value of the property. These home renovations can become your relaxed hangout area with family and friends. From drinking iced lattes to playing the card game Uno with friends, this home can be everyone's gathering place.

Summer will be over soon, but what about the memories you create in your own backyard? You will treasure them for a lifetime. Whether it’s building a new deck, installing landscape lighting, or adding a cozy firepit, homeowners are turning to platforms like UrbanTasker to post their projects and quickly connect with skilled professionals. What are you waiting for? Post a Task and Get Free Quotes from Skilled Pros in your area.

Ready to transform your outdoor space this season? Let the right pros help make your vision a reality!


outdoor living project
outdoor living project canada
backyard renovation
outdoor living projects
backyard projects
canadian summers

Write your comment 

Comments

Related Articles

How much does it cost to install Gazebo in Canada? Installation Prices, Materials & Permits

Gazebos, also known as garden pavilions or pergolas, have long been cherished additions to outdoor spaces, providing a charming and versatile retreat amidst nature's beauty. In Canada, where the outdoors plays a significant role in lifestyle and leisure, gazebos hold a special place in enhancing outdoor living spaces. That's why it becomes important to consider all things before going for the installation and cost is one of them. ## How Much Does It Cost to Install a Gazebo in Canada? 2026 Pricing Guide Installing a gazebo in Canada costs between $1,500 and $10,000 in 2026 for most homeowners, with a typical 10×10 ft gazebo averaging $2,500–$6,000 installed. Smaller pop-up or soft-top kits start around $400–$1,500, while custom-built permanent wood structures can exceed $15,000. The breakdown is usually 60–70% materials and 30–40% labour. Professional installation alone runs $300–$2,000 depending on size and complexity, while DIY assembly typically takes 6–12 hours with 2–4 people. Costs in major cities like Toronto, Vancouver, and Calgary tend to run 10–20% higher than smaller Ontario or Prairie towns due to labour rates and demand. ## Gazebo Installation in Canada - Quick Cost Guide | Gazebo Size | Soft-Top / Pop-Up | Metal / Hard-Top Kit | Wood / Composite | Custom Built | |---|---|---|---|---| | Small (8×8 ft) | $400 – $1,200 | $1,500 – $3,000 | $2,500 – $4,500 | $4,000 – $7,000 | | Medium (10×10 ft) | $800 – $1,800 | $2,500 – $5,000 | $3,500 – $6,500 | $6,000 – $10,000 | | Large (12×14 ft) | $1,500 – $3,000 | $4,000 – $8,000 | $5,500 – $9,500 | $9,000 – $15,000 | | Extra Large (14×16 ft+) | $2,500 – $4,500 | $6,500 – $12,000 | $8,500 – $14,000 | $14,000 – $25,000+ | *Estimates include materials and professional installation. Foundation work, permits, and extras (lighting, screens, electrical) are typically separate. Prices vary by province and contractor — always get 3+ quotes.* ## What Affects the Cost of Gazebo Installation? 6 Factors do most of the work in determining the final price: ### 1. Gazebo Size and Square Footage Gazebos are typically priced at $75–$100 per square foot installed. An 8×8 ft gazebo (64 sq ft) and a 12×12 ft gazebo (144 sq ft) might look similar in catalogue photos but cost twice as much to build and install. Each additional 2 feet of dimension roughly doubles the structural materials needed. Larger and more intricate gazebos often involve more extensive foundation preparation, structural components, and roofing materials, leading to higher installation costs. ### 2. Material Selection This is the single biggest cost driver. The same 10×10 ft footprint can cost $1,500 or $10,000 depending on what it's built from: ### 3. Gazebo Type and Roof Style - Soft-top (fabric): Cheapest, easiest to install, but the canopy needs replacement every 2–4 years. - Hard-top (metal or polycarbonate): Mid-priced, sturdier, lasts 10–20 years. - Wood-framed permanent: Higher upfront, lasts 20–40+ years with maintenance. - Custom-built with shingled roof: Most expensive, looks like a small building, integrates with home architecture. ### 4. Foundation and Site Preparation A flat, prepared surface is the assumption behind every gazebo quote. If your yard slopes or has soft soil, you'll need foundation work before installation: - Gravel pad: $200 – $500 - Patio stones / pavers: $500 – $1,500 - Concrete slab: $1,000 – $3,000 - Pier footings (for permanent gazebos): $800 – $2,000 - Deck mounting (if installing on existing deck): typically no extra cost ### 5. Add-Ons and Extras These commonly push budgets over: - Mosquito screens / netting: $300 – $1,500 - Outdoor lighting / ceiling fan: $400 – $2,000 - Electrical hookup: $500 – $2,500 - Curtains / privacy panels: $200 – $800 - Heaters: $300 – $1,200 ### 6. Location Within Canada Labour rates vary significantly across the country. Urban areas with high demand (Toronto, Vancouver, Calgary) typically run 15–25% higher than rural areas. Booking in off-peak season (fall or early spring) often shaves 10–15% off installation labour. ### Gazebo Material Comparison: Wood vs Metal vs Vinyl vs Soft-Top | Material | Cost Range (10×10 ft, installed) | Lifespan | Maintenance | Best For | |---|---|---|---|---| | Soft-top fabric | $800 – $1,800 | 3–7 years | Replace canopy every 2–4 yrs | Seasonal use, renters, tight budgets | | Steel / aluminum hard-top | $2,500 – $5,000 | 10–20 years | Low (occasional rust check) | All-season backyards, low-effort owners | | Vinyl | $2,500 – $4,500 | 20–30 years | Very low (wash annually) | Long-term ownership, modern look | | Cedar / wood-framed | $3,500 – $6,500 | 20–40 years | Stain every 2–3 yrs | Classic aesthetic, heritage homes | | Composite (wood-look) | $4,500 – $8,000 | 25–35 years | Very low | Wood look without the upkeep | | Custom-built / permanent | $6,000 – $15,000+ | 40+ years | Same as a home structure | Investment properties, integrated outdoor living | Here are the cost details of a Standard 10×10 ft Gazebo ### Detailed Cost Breakdown for a 10×10 ft Gazebo | Component | Cost Range | |---|---| | Gazebo kit (mid-range hard-top) | $2,000 – $4,000 | | Foundation (gravel pad or pavers) | $300 – $1,000 | | Professional installation labour | $500 – $1,500 | | Anchors, hardware, sealants | $100 – $250 | | Delivery (if pre-fab) | $150 – $400 | | Permit (if required) | $0 – $300 | | **Typical Total** | **$3,050 – $7,450** | Most Canadian homeowners spend around $4,500 all-in for a 10×10 ft installed gazebo with basic foundation work. ### Do You Need a Permit to Install a Gazebo in Canada? For most small-to-mid sized gazebos in Canada, you do not need a building permit — but the threshold varies by municipality and by whether the structure is permanent. ### General rules across Canadian municipalities: - No permit usually required for: Soft-top or temporary gazebos, structures under 10 sq m (108 sq ft) without a permanent foundation, freestanding pop-up canopies. - Permit usually required for: Permanent gazebos over 10–15 sq m, any structure with a concrete foundation, gazebos with electrical or plumbing, gazebos attached to a house or deck with a roof, structures within setback distances from property lines. ### City-specific examples: - **Toronto:** Permit required for accessory structures over 10 sq m or those with foundations. - **Mississauga / Brampton:** Permit required for structures over 15 sq m or attached to a dwelling. - **Vancouver:** Permit required for any structure over 10 sq m or with utilities. - **Calgary:** Permit required for structures over 10 sq m or built on a permanent foundation. Always confirm with your municipality before installing. Permit fees typically run $100–$300 for residential accessory structures. ### DIY vs Professional Gazebo Installation: Which Saves More? For most homeowners, professional installation costs $500–$2,000 extra but saves 6–12 hours of work and avoids common mistakes like uneven anchoring, misaligned roof panels, and damaged components that void the manufacturer's warranty. ### DIY vs Professional Gazebo Installation— Cost & Time Comparison | Factor | DIY | Professional | |---|---|---| | Labour cost | $0 (your time) | $300 – $2,000 | | Time required | 6–12 hours, 2–4 people | 2–6 hours | | Tools needed | $50 – $300 (drill, wrench set, level, ladder) | Included | | Warranty risk | Manufacturer warranty can be voided by incorrect assembly | Covered + installer warranty (typically 1 year) | | Foundation work | Usually not included; you handle it | Some installers include simple prep | | Best for | Small kits, soft-tops, handy homeowners | Larger hard-tops, custom builds, anyone short on time | It really depends on your situation. Like if you have time and skills but you know tight on budget then DIY is the best considering you are aware of the cons. However, if you're short on time and don't have much construction experience, or want the peace of mind that comes with a warranty, it's best to hire a professional. ### When DIY Makes Sense? - Soft-top or pop-up gazebos under $1,500 - You have at least one experienced helper - The site is already level and prepared - You're comfortable working at heights ### When to Hire a Pro? - Hard-top or wood-framed gazebos over 10×10 ft - Installation on a deck or uneven ground - You need electrical, lighting, or screens added - The gazebo will be a permanent structure requiring a permit Need quotes from local pros? **[Post your gazebo installation task](https://urbantasker.com/tasks/create)** and get free quotes from nearby installation experts within 24 hours. ### Gazebo Installation Cost by Canadian City Labour rates and demand vary significantly across Canada. Here's what to expect in major markets: | City / Region | Avg Installation Cost (10×10 ft) | Notes | |---|---|---| | Toronto / GTA | $700 – $2,000 | Highest demand, premium contractor rates | | Vancouver / Lower Mainland | $700 – $1,800 | High demand, weather windows tight | | Calgary / Edmonton | $500 – $1,400 | Moderate rates, more rural pros available | | Ottawa | $500 – $1,500 | Mid-range Ontario pricing | | Montreal | $450 – $1,300 | Generally lower labour rates than Ontario | | Winnipeg / Regina | $400 – $1,200 | Lower urban labour rates | | Halifax / Atlantic Canada | $450 – $1,300 | Limited installer pool in smaller towns | *Costs reflect labour only; gazebo kit and foundation are separate.* You may also like to explore **[Weed Control for Lawns in Ontario, Canada - What are the Best Options to Remove Weeds?](https://urbantasker.com/blog/weed-control-for-lawns-in-ontario-canada-best-options-to-remove-get-rid-of-weeds)** ## What are the Steps Involved in Gazebo Installation? Here are the most important steps involved in typical Gazebo installation: ### 1. Site Preparation: The first step is site preparation. This step is important and crucial because it ensures an adequate space for the gazebo along. So, if you have decided to do yourself then consider factors such as drainage, proximity to surrounding structures, and potential obstructions. ### 2. Foundation Preparation: Generally in foundation preparation, concrete slabs or piers are used for larger gazebos, while smaller gazebos gravel or compacted soil is used. ### 3. Frame Assembly: The gazebo frame is assembled piece by piece, ensuring proper alignment and adherence to manufacturer's instructions. Precision is essential to ensure the gazebo's stability and structural integrity. ### 4. Roof Installation: The roof's material, whether wood shingles, metal roofing, or vinyl panels, is installed according to the manufacturer's guidelines. Proper sealing and ventilation are crucial to prevent water damage and ensure weatherproofing. ### 5. Final Touches: Once the frame and roof are in place, finishing touches are applied, including installation of railings, lighting, and any decorative elements. ### 6. Inspection and Adjustments: In this step, a thorough inspection is conducted to ensure the gazebo is properly assembled, levelled, and secure. Any necessary adjustments or modifications are made to guarantee stability and functionality. Also, have a look at **[What are factors that affect the Price of Interlocking Driveways, Patios & Walkways?](https://urbantasker.com/article/what-are-factors-that-affect-price-of-interlocking-driveways-patios-walkways)** ### 7. Installation Done & Ready to Use With the gazebo fully installed, it's ready to be raised to its final position. Once ready, you can use your newly covered space and use it to for different purposes. ## How to Save Money on Gazebo Installation? You can reduce costs meaningfully without sacrificing quality: - **Get 3+ written quotes.** Gazebo installation quotes can vary by 30–50% for the same job. Compare scope of work, not just the bottom line. - **Book in shoulder season.** Late fall and early spring quotes typically beat peak summer pricing by 10–15%. - **Buy the kit and hire only for assembly.** Costco, Home Depot, and Lowes carry many of the same models that pros bundle into quoted "installed" prices — buying separately can save $200–$500. - **Choose a standard size.** 8×8, 10×10, and 12×12 ft are the most common; custom dimensions cost significantly more in both materials and labour. - **Prepare the site yourself.** Laying a gravel pad or installing pavers as a DIY project before the installer arrives saves $500–$1,500 in prep costs. - **Mount on an existing deck if possible.** Skips the foundation cost entirely if your deck is structurally sound. - **Skip extras you don't need today.** Lighting, screens, and curtains can be added later. Get the structure up first. ## How to Choose a Gazebo Installer in Canada? A reliable gazebo installer should clear these checks before you sign anything: - **Insured** — proof of liability insurance. - **Experienced with your specific brand** — Yardistry, Sunjoy, and other major brands have model-specific assembly quirks. - **Written, itemized quote** — hours, hardware, foundation scope, and warranty terms in writing. - **Local references** — recent gazebo jobs within your region, ideally within the last 12 months. - **Workmanship warranty** — at least 1 year on labour is standard. - **No high-pressure tactics or large upfront deposits** — 10–20% deposit is reasonable; anything over 50% is a red flag. ## Budgeting for Your Canadian Gazebo Installation Gazebo installation can be an expensive task. So, before installation, plan properly and make sure to consider and follow all the steps and tips. In case you are not clear or have some doubts in gazebo installation then do consult to the professionals. A gazebo is one of the better-value backyard investments a Canadian homeowner can make — it extends your usable outdoor season, adds an outdoor entertaining space, and (if you build it right) increases curb appeal. For most Canadian backyards, budget $2,500–$6,000 for a quality 10×10 ft hard-top or wood-framed gazebo installed, with another $500–$1,500 in foundation and extras. The biggest wins on cost come from getting multiple quotes, choosing standard sizes, doing site prep yourself, and booking in shoulder season. Ready to get started? **[Post your gazebo installation task](https://urbantasker.com/tasks/create)** on UrbanTasker and compare free quotes from local installers across Canada.

10 Best Home Improvement Blogs to Follow in Canada

If you are planning for a complete kitchen redesign, need to brighten up your backyard, or do it yourself, then **home improvement blogs** are your best friends. But enquiring locally is a hassle, at least in Canada, where every aspect of your home seems to be influenced by changing seasons. Like choosing the best paintings that will survive the Alberta winters and how to keep your attic warm in Quebec, local advice is worth gold. Blogs are just not about home improvements, trendy decorations, and fashionable pictures. They impart practical hands-on tips and directions based on first-hand professional experience. From people sharing their trade secrets to documenting their renovation process, the details we shared here are full of great ideas and tips. Most of them are Canadian homeowners, who will give you an idea of what to look for during your home improvement process. ## 10 Best Home Improvement Blogs to Look for Here is the list of some of the trending home improvement blogs filled with great knowledge and practical solutions. ## 1. UrbanTasker UrbanTasker is not just a platform for Canadians to connect with reliable home service professionals. But, it also has an interesting **[home niche blog](https://urbantasker.com/blog)** section, a dynamic resource designed to benefit both homeowners and service providers alike. For homeowners, it offers practical tips, seasonal guides, and expert insights that make home improvement, maintenance, and renovation decisions easier and more informed. Meanwhile, service providers gain valuable exposure through featured content, trending topic coverage, and educational posts that position them as trusted experts in their field. This helps them attract new clients and stand out in a competitive market. Together, the UrbanTasker blog fosters a vibrant community built on knowledge sharing and connection. UrbanTasker is your all-in-one destination to post tasks effortlessly, hire local professionals with confidence, and expand your knowledge with expert tips and insights—all in one place. No fluff, only practical information! Join the UrbanTasker community now! **[Post Your Task](https://urbantasker.com/tasks/create)** and Get Free Quotes from Skilled Providers in your area. ## 2. The Young House Love The Young House Love is a motivational DIY blog that follows the moulding escapades of John and Sherry Petersik in their mission to redesign their home. Using mostly hand-me-downs and their crafty ideas, this blog is full of inspiration for those who want to have a high-end finished product on a budget. Credibility is one of the many things this blog offers to its readers: descriptive content and compelling narration. Young House Love releases its post once or twice a week, sharing room designs, renovation of furniture, home storage, and decor tricks. ## 3. Bob Villa Bob Villa is your home guru, and his blog provides you with amazing tips and techniques from professionals to all kinds of homeowners. Bob Villa and his team give you information and lots of skills to restructure the bathroom of your home or just clean it up. Some might consider the writings of Bob Villa to be conservative, with their wide range of topics delivered with a strong authority. Updates are issued weekly, and the subject covers home repair, renovations, remodelling, landscaping, and even some specific tools. With that said, here all your questions will be answered about the home improvement project. ## 4. Best Builders Blog The Best Builders Blog is the site where the craftsmanship meets the beauty of architecture that is celebrated in Western Canada. The blog has both informative and inspirational content about award-winning custom homes and designer finishing. They go into the details of the rainy climate of B.C. including waterproofing, antifungal building materials, and solutions that turn aesthetics into a higher art form. The reader is well informed of the reason behind choosing certain timbers and how readers can reduce the cost of expensive finishes. If you are a fan of good craftsmanship and detail, then this blog is perfect for you. ## 5. Rambling Renovators Rambling Renovators feels as if you are exchanging renovation stories with your family. The centre of the blog is Jen, who oversees everything from modernizing the outdated kitchen to renovating the laundry rooms in her Canadian home. She is truthful, humorous, reliable, and relatable, and her writing style is immaculate. Free of usual hiccups along the way and no sticker shock, Jen guides you through the good and the bad and every once in a while, the ugly. She also interjects some seasonal tips along with product reviews from a Canadian standpoint. If you are a beginner or someone who wants a dose of reality, then Rambling Renovators is your go-to place. ## 6. Homey Improvements This blog is a resourceful site for tips and affordable home improvement projects to refresh the living environment without straining your bank account. Whether it's straightforward DIY repairs or Homey Improvements, they provide practical solutions on how to turn your place of living into something more lively and comfortable. Homey Improvements posts affordable and sustainable products. Its content is updated regularly to include home maintenance, **[budget remodelling](https://urbantasker.com/blog/how-much-should-i-budget-for-home-maintenance-repairs-in-canada)**, and even do-it-yourself home improvement projects. ## 7. Kitchen & Bath Blog Kitchen & Bath Blog takes you deep into the ideas of kitchen makeover and bathroom retrofitting with expert thinking and style. The authors of the books, usually professionals, are not afraid of difficulties such as narrow rooms, non-standard plumbing plans, or non-standard ventilation problems. All of their posts feature real renovation projects like a family kitchen transformed into a cosy entertaining area, or a bathroom created to feel like a small spa. There is also this Canadian perspective, where moisture-resistant materials are added to deal with humid summer weather and the issue of cold climates. Want a gorgeous and practical kitchen or a plush bathroom? Then this blog is filled with imagination as well as the practical solutions to execute it. ## 8. Remodelista Remodelista is based on the ideas of timeless design and craftsmanship, and includes a set of extravagant home renovations and global design inspiration. It offers an array of designs to fit all kinds of tastes, whether it is Scandinavian minimalist or simple farmhouse. Remodelista also has beautiful photography and well-selected content on its page. But, readers who have a limited budget might be discouraged by its focus on luxury. It has periodic updates featuring home tours with careful details, product lists, design trends, and architectural content. Also, have a look at **[5 Best Home Renovations to Increase Your Home's Value Before Selling](https://urbantasker.com/blog/best-home-renovations-to-increase-your-home-value-before-selling)** ## 9. Apartment Therapy Apartment Therapy is a home improvement blog that considers both the needs of urban residents and people who live in tiny apartments. Apartment Therapy offers practical space-saving tips, convenient do-it-yourself projects, or anything that helps to make any home look better and highly functional. It gives you a new point of view on the improvement of living spaces and interior design. Their blogs are generally on the city lifestyle and the economic aspect, but there is a slight chance that the content provided by the site may be too narrow in its focus. They release new material from time to time, which includes information about small space design, organization hacks, decorating hacks for rentals, and sustainable living. ## 10. Peak Improvements Peak Improvements strives to make each post sound as if a friend is telling a story about her remodeling project with its exciting tales and recommendations. The stories are based on before and after images, materials lists, cost breakdowns, and desirable timelines. They show real-life makeovers of home rooms converted to family room, contemporary kitchen, and old-fashioned rooms, etc, with revived allure. They even plunge into some local tips when it comes to heating, insulation, and moisture control, as Canada has a wide range of climate regions. Also, have a look at our exclusive article on **[Women in Skilled Trades in Ontario, Canada: Breaking Barriers and Building the Future](https://urbantasker.com/blog/women-in-skilled-trades-ontario-canada-programs-funding)** ## Why Home Improvement Blogs are an Important Resource? Home improvement blogs are an important resource because they offer practical tips, creative ideas, and expert insights to help homeowners make informed decisions. They inspire projects big and small, turning ordinary spaces into personalized, functional, and beautiful homes. Articles can go anywhere in length up to a full-blown renovation scheming with step-by-step actions and honest thoughts. When you need an inspiration that gives a pinch of reality in addition to troubleshooting assistance, then Home Improvement Blogs is your go-to place. Which is your favourite Home niche blog? Do share in the comments. ### What is the Ultimate Home Renovation Checklist? Before going through an actual renovation, you first need a renovation checklist to make things easier. - You should begin by setting your objectives in terms of renovation. - Tour your place and make a list of things that have to be changed. - Strictly observe the proper order: demolition, plumbing, electrical, painting, and flooring. • Find the duration and the cost of each step that meets your needs. - Make a single file for everything or two applications, and use an updated checklist when carrying out a renovation. Home improvement blogs guide you in gaining useful information, inspiring ideas, and practical tips to enhance your living space. You may also like **[7 Ways to Prepare Your Home for Summer Season in Canada](https://urbantasker.com/blog/ways-to-prepare-your-home-for-summer-season-canada-maintenance)** ### What is the Right Plan for My Home Renovations? Everybody needs the right plan for their home renovations. - Make an affordable budget and mention a contingency of 10- 20 percent. - Establish what you are going to be doing and what you are going to have to contract out. - Get ideas through Pinterest, magazines, or Canadian blogs. - Interview the contractors and find different quotes. • - Go through license verification, insurance, and work reviews. - Make a list of all things in a folder or app and easily refer to them. Home improvement blogs can help you figure that out by offering expert tips, real-life project ideas, and step-by-step guides to plan smarter and renovate better. ### Home Improvement Blogs A home renovation can feel overwhelming, but with the right tools and creative ideas, it becomes much more manageable. A bit of organization and learning can make it a thrilling and satisfying experience. Be it a complete rework of your kitchen or just a small renovation to your bathroom. These Canadian home improvement blogs will provide you with all the assistance and inspiration that you need. Start by having a good plan, and do not hesitate to seek assistance. Have a favourite Canadian home improvement blog or tip to share? Drop it in the comments — we’d love to hear what inspires your next project!

7 Ways to Prepare Your Home for Summer Season in Canada

Summer is the time in Canada which is indeed beautiful, but it often brings along hot and humid days. And it becomes really tough to keep our homes cool and comfortable during this time. So, it's important to take important steps and figure out ways that could help us in keeping our home cool and preparing it for a perfect living space. Let's discover 7 simple ways that will help you get your home ready for a comfortable summer. ## 7 Ways to Prepare Your Home for Summer Season in Canada Here are the 7 ways to prepare your home for summer season in Canada: ## 1. Thorough Air Conditioner Maintenance One of the first step is to make sure that your HVAC system is working fine. Here's a breakdown of what you need to do: - **Change the Air Filter:** Start by replacing your air conditioner's air filter every 1-3 months. A clean filter ensures the air flows smoothly, which is important for effective cooling and saving energy. - **Schedule HVAC Maintenance:** Before summer arrives, scheduling **[HVAC maintenance](https://urbantasker.com/blog/importance-of-hvac-maintenance-how-skilled-technician-can-help)** is crucial to ensure your system runs efficiently during the hot months. A professional tune-up can help detect issues early, improve energy efficiency, and extend the lifespan of your unit. - **Important tips:** Cleaning filters, checking refrigerant levels, and inspecting electrical components can prevent costly breakdowns and keep your home cool and comfortable when you need it most. You may also like to discover **[What is the Best Temperature for AC in Summer in Canada?](https://urbantasker.com/blog/what-is-best-temperature-for-ac-in-summer-canada)** ## 2. Install Strategic Window Coverings Make sure your windows are properly covered with the heat-reflective material. See, the window coverings play a significant role in reducing heat gain from sunlight and improving overall comfort. With the **[Canadian summer](https://urbantasker.com/blog/why-summer-is-perfect-time-to-tackle-your-home-renovation-projects)** bringing longer, sunnier days, installing the right window coverings can make a big difference in keeping your home cool and energy-efficient. Consider using thermal curtains, blackout blinds, or reflective shades to block out the heat during peak daylight hours. Not only do these window treatments help reduce the strain on your air conditioning, but they also protect your furniture and flooring from UV damage - making them a smart and stylish seasonal upgrade. ## 3. Paint Your Home's Outside a Lighter Color Paint the outside of your house with a lighter colour. Because the dark colours soak up more heat, making your home warmer inside. Lighter colours reflect sunlight, keeping your house cooler. This change not only freshens up your home's appearance but also helps save on cooling costs. Make sure to clean and fix any damaged spots before painting, and use paint that's made for Canada's weather. A lighter colour can also make your landscaping and house features stand out while keeping things comfortable during summer. ## 4. Manage Windows and Doors Effectively Proper management of windows and doors can prevent heat from entering your home and maintain a comfortable indoor environment. Follow these guidelines: - **Daytime Closure:** Keep windows and doors closed during the hottest parts of the day to prevent warm air from seeping into your home. - **Nighttime Ventilation:** Take advantage of cooler nighttime temperatures by opening windows and doors. This allows fresh air to circulate through your home, cooling it down naturally. ## 5. Create Natural Shading Strategic placement of trees and shrubs can provide natural shading, reducing solar heat gain. Here's how to do it: **Plant Deciduous Trees:** Think about planting deciduous trees strategically around your home. These trees offer shade in summer and allow sunlight through in winter, striking a balance between comfort and energy efficiency. - **Shrubs Near Windows:** Place shrubs near windows and walls to block direct sunlight. This small change can notably cut down heat transfer, keeping your home cooler without solely depending on air conditioning. You may also like **[How AI is Revolutionizing Home Services? Home Improvement and Designing](https://urbantasker.com/blog/how-ai-is-revolutionizing-home-services-improvement-designing)** ## 6. Use a Dehumidifier In humid regions or areas prone to moisture buildup, a dehumidifier can be a game-changer in maintaining comfort. Follow these tips: - **Choose the Right Size:** Select a dehumidifier that's appropriate for your home's square footage. A properly sized dehumidifier ensures effective moisture removal without wasting energy. - **Regular Maintenance:** Keep your dehumidifier in top condition by cleaning or replacing its filters as recommended by the manufacturer. This ensures optimal performance throughout the summer months. You may also like to discover **[Sizzling Trends: Top 5 Outdoor Living Projects Homeowners Love This Summer Season](https://urbantasker.com/blog/top-outdoor-living-projects-homeowners-love-summer-season-trends)** ## 7. Enhance Energy Efficiency Now let's focus on enhancing the energy efficiency of your home. Here's what you can do: - **Seal Air Leaks:** Check every part of your windows, doors, and ducts for leaks. If you find any, seal them with weatherstripping or caulking to keep cool air in and hot air out. - **Upgrade to Energy-Efficient Appliances:** If you have old appliances, then replace these appliances with energy-efficient models. This includes refrigerators, air conditioners, and even light bulbs. Energy-efficient appliances not only consume less electricity but also perform better, contributing to a more comfortable indoor environment. - **[Install a Smart Thermostat](https://urbantasker.com/blog/can-installing-smart-thermostat-save-you-money):** Installing a programmable or smart thermostat will help you in adjusting cooling based on your daily routine. This will make sure that your air conditioner runs efficiently when needed and reduces energy consumption when you're not in the home or asleep. ### Home Maintenance Tips for the Summer Season : Additional Ways Here are some additional tips that you must follow during the summer season: 1. **Fans and Shades:** Use fans and install shades to circulate cool air and block out sunlight, respectively. 2. **Stay Hydrated:** Keep hydrated to beat the heat indoors and outdoors. 3. **Insulation:** Check and optimize insulation to maintain consistent indoor temperatures. 4. **Outdoor Planning:** Plan outdoor activities for cooler times of the day and use outdoor shades for comfort. You may also discover **[Best 5 Home Security Systems in Canada](https://urbantasker.com/blog/best-home-security-systems-canada-top-list)** ## Prepare Your Home for Canadian Summers By following these detailed steps and properly following them into your summer preparation routine, you can create a cool, comfortable, and energy-efficient home environment for the hot months ahead. How do you prepare your home for the summer season? Do share your unique ways and ideas. Getting your home ready for the summer season can feel overwhelming, but that’s where **[UrbanTasker](https://urbantasker.com/)** comes in. Whether you need help with air conditioner servicing, outdoor cleaning, lawn care, or deck repairs, UrbanTasker connects you with skilled local professionals who can handle it all. Tired of juggling multiple service calls or DIY attempts? You can simply **[Post your Task to Get Free Quotes](https://urbantasker.com/tasks/create)** and let experienced pros take care of it efficiently and affordably. With UrbanTasker, preparing your home for summer becomes hassle-free, so you can focus on enjoying the sunshine instead of stressing over to-do lists.

Deck Painting and Staining Cost Guide in Ontario, Canada: How much does it cost?

So, your deck has seen better days. Maybe the wood is greying, the old stain is peeling off in strips, or you just want the backyard to stop looking like an afterthought. Whatever brought you here, you're probably wondering the same thing every Ontario homeowner wonders before starting this project: what's this actually going to cost me? The honest answer is — it depends. But let's break it down in a way that actually makes sense, so you can walk into this with realistic expectations and no nasty surprises when the quote lands in your inbox. ## Deck Painting and Staining Cost: A Real Number Breakdown for Ontario Homeowners Across Ontario, deck painting and staining costs can swing anywhere from a few hundred dollars on the low end to well over six thousand on the high end. Here's a rough idea of what people are paying: ### Deck Painting & Staining Cost by Project | Project | Cost Range (CAD) | Per Sq Ft (GTA) | Timeline | |---|---|---|---| | Small deck staining (under 200 sq ft) | $550 – $1,100 | $2.25 – $4.00 | 1 day | | Mid-sized deck staining (200–400 sq ft) | $1,495 – $3,000 | $2.25 – $4.00 | 1 – 2 days | | Full deck painting | $1,400 – $6,000+ | $3.00 – $5.00 | 2 – 3 days | | Paint stripping + full restain | $5,000+ | $4.00 – $6.50 | 3 – 5 days | | Pressure wash only | $250 – $600 | $0.50 – $1.00 | Half day | If you're in the GTA, expect to pay roughly $2.25 to $4 per square foot for professional work. On a 400 sq ft deck, that's somewhere between $900 and $1,600 in labour alone — before anyone's even cracked open a tin of stain. ## Painting or Staining — Does It Really Matter?? Yes, and the difference is bigger than most people realize — not just in how it looks, but in what you'll be paying for years down the road. ### Stain vs Paint for Decks | Factor | Stain | Paint | |---|---|---| | Product cost (per gallon) | $20 – $35 | $30 – $65 | | How it wears | Fades gradually, gracefully | Chips and peels | | Prep for reapplication | Minimal (clean & recoat) | Heavy (strip old paint) | | Lifespan (Ontario climate) | 2 – 3 years | 3 – 5 years (if intact) | | Worst-case re-do cost | Low | $5,000+ (full strip) | | Hides flaws / old wood | No | Yes | | Best for | Most Ontario decks, natural look | Heavily weathered wood needing uniform colour | For most Ontario homeowners, staining is the smarter long-term call — lower upfront cost, less headache down the line. You may also like: **[How Much Should it Cost to Paint the Outside of House in Canada? Exterior Painting Pricing](https://urbantasker.com/blog/cost-to-paint-outside-of-house-exterior-painting-canada)** ## What's Actually Driving the Price? When you get a quote, and it's higher than you expected, here's what's usually behind it: The size and layout of your deck. A small, flat, single-level deck is a completely different job from a sprawling two-level structure with built-in benches and wraparound stairs. Larger, more complex decks can take four to six full days of work. That time adds up fast. How bad is the deck in? If the wood is cracked, heavily weathered, or covered in years of grime, the contractor isn't just slapping on a coat of stain. There's pressure washing, sanding, brightening treatments — prep work that can tack on an extra $1 to $2 per square foot before the real work even begins. It's not padding the bill; it's what makes the finish actually last. What's already on the wood? This one catches a lot of homeowners off guard. If there's an old layer of paint, sealant, or stain sitting on your deck that hasn't fully worn away, it needs to come off first. New stain won't absorb properly into wood that's already coated, and if you skip this step, you'll be watching it peel within a season. Not worth it. Stairs, railings, all the details. These features take longer to coat than the open deck boards, sometimes much longer. Every baluster, post cap, and fascia board adds time to the job, and time is money. Where do you live? Contractors in Toronto and the broader GTA tend to charge a bit more than those in smaller Ontario cities. Higher overhead, higher demand — it's just the reality of working in that market. ### What Drives Deck Job Pricing? | Cost Driver | Impact on Price | Notes | |---|---|---| | Deck size & levels | High | Multi-level decks take 4 – 6 days | | Wood condition | +$1 – $2/sq ft | Heavy weathering needs sanding/brightening | | Existing coating | +$1 – $3/sq ft | Old paint/sealant must be stripped | | Railings, stairs, details | Medium-High | Slower than open boards | | Location (GTA vs rural) | +10 – 20% | Higher overhead in Toronto/GTA | | Season (spring rush) | +10 – 15% | Book shoulder season to save | ## How Long Before You Have to Do This Again? A quality staining job, done properly and maintained with regular cleaning, can hold up for two to three years — sometimes longer. Paint has a similar lifespan when applied well, but the re-do process is more involved if things start to deteriorate. The keyword there is “maintained”. A quick clean once a season and addressing small issues early makes a real difference in how long the finish holds. ## When Should You call a professional? Spring is the sweet spot in Ontario. Temperatures are stable, humidity isn't through the roof, and you've got the whole summer ahead of you to actually enjoy the finished result. Book too late in the season and you're either rushing contractors or waiting until next year. But, is there any platform to find skilled and local home service professionals? That is honestly where platforms like **[UrbanTasker](https://urbantasker.com/)** takes a lot of the headache out. You post what you need to get done, and instead of chasing people down, you can get multiple quotes from local service providers. You get to look at their pricing, check who is available when you need them, and then just pick the one that makes sense. No awkward phone calls, no waiting around for callbacks, no feeling like you are flying blind on what something should cost. For a lot of Canadian homeowners, that kind of straightforward process is exactly what makes getting home repairs done feel a lot less like a chore. ### Deck Painting and Staining Cost in Ontario Keeping up with regular staining or painting can cost up to 90% less than replacing the deck entirely. That's not a small gap — that's the difference between a manageable maintenance expense and a major renovation bill. A well-kept deck also adds genuine value to your home, both in how it looks and what it's worth on paper. A little investment now buys you years of outdoor living — and keeps the really expensive decisions further down the road.

Heat Pump vs Furnace - Are Heat Pumps Worth it?

Climate change is a hot topic in Canada these days and Heat pumps are at the forefront of this debate since heat pumps are expected to replace older HVAC appliances like Furnace and Air Conditioners. However, switching to heat pumps is not a trivial decision and many queries come of homeowners mind on whether they should replace their existing appliances with heat pump or not. In this blog, we will specifically analyze **Heat Pump vs Furnace**. We will attempt to answer whether heatpump is worth it or not and whether there is a long term savings in replacing furnace with heat pump. ### Heat Pump vs Furnace Head-to-Head | Factor | Heat Pump | Gas Furnace | |---|---|---| | Upfront cost (installed, CAD) | $7,000 – $15,000 | $4,000 – $9,500 | | Heating + cooling | Both (all-in-one) | Heating only (needs separate AC) | | Annual operating cost | $1,000 – $1,800 | $900 – $2,200 | | Efficiency | 200 – 400% (COP 2–4) | 95 – 98% AFUE | | Cold-climate performance | Good w/ cold-climate models to -25°C | Excellent in extreme cold | | Lifespan | 12 – 18 years | 15 – 20 years | | Rebates available | $4,000 – $10,000+ | $500 – $7,500 | | Best for | Year-round efficiency, mild-moderate winters | Extreme-cold regions, low gas prices | ## What is a Heat Pump ? A heat pump is a versatile HVAC system that efficiently regulates indoor temperature by transferring heat between the indoors and outdoors. Its acts as both a heater and an air conditioner. ## How does a Heat Pump work ? Heat Pump's working mechanism is different from furnace. It utilizes a refrigeration cycle to extract heat from the air or ground outside and distribute it inside during colder months (yes even the cold air has heat that can be extracted as far as refrigants temperature is lower than the air itself). In warmer weather, the process is reversed, expelling indoor heat to maintain a cooler environment. Unlike traditional heating or cooling systems, heat pumps are claimed to be energy-efficient and eco-friendly, as they move existing heat rather than generating it. We will analyze this in detail in this blog. ## How many types of Heat Pumps are there? In Canada, there are several types of heat pumps available for installation, each with its own characteristics and suitability for different applications. Here are the main types of heat pumps: ### 1. Air Source Heat Pumps (ASHP): - *Description:* ASHPs are the most common type of heat pump. They extract heat from the outdoor air and transfer it inside during the heating season. In the summer, the process is reversed to provide cooling. - *Suitability:* ASHPs are effective in moderate climates and these are the ones that are recommended in Canada mostly. ### 2. Ground Source Heat Pumps (GSHP or Geothermal Heat Pumps): - *Description:* GSHPs extract heat from the ground through a series of pipes buried underground. They are highly efficient as ground temperatures remain relatively stable throughout the year. - *Suitability:* GSHPs are well-suited for areas with enough land space for the ground loop installation. While the initial cost is higher, they can offer significant long-term energy savings. ### 3. Ductless Mini-Split Heat Pumps: - *Description:* These systems consist of an outdoor unit and one or more indoor units. They are called "ductless" because they don't require ductwork. Each indoor unit can be controlled independently. - *Suitability:* Ductless mini-split heat pumps are ideal for homes without existing ductwork, or for room additions where extending ducts may be impractical. ### 4. Hybrid Heat Pumps (Dual-Fuel Systems): - *Description:* Hybrid heat pumps combine the efficiency of a heat pump with a backup heating source, usually a furnace. The system automatically switches between the two based on outdoor temperatures to optimize efficiency. - *Suitability:* Hybrid systems are suitable for areas with varying climate conditions, ensuring optimal performance in extreme cold temperatures. ### 5. Absorption Heat Pumps: - *Description:* Absorption heat pumps use heat as an energy source, typically from natural gas or solar energy. They are less common in residential settings but are considered environmentally friendly. - *Suitability:* Absorption heat pumps are suitable for specific applications where alternative energy sources are preferred. This is not the kind of heat pump that one will prefer in Canada especially if it uses natural gas. ### 6. Water Source Heat Pumps: - *Description:* Water source heat pumps transfer heat to or from a water source, such as a lake or well. They are energy-efficient but require access to a water source. - *Suitability:* Water source heat pumps are suitable for properties with access to a consistent and adequate water source. ### Heat Pump Type Comparison | Heat Pump Type | Installed Cost (CAD) | Best For | Notes | |---|---|---|---| | Air-source (ducted) | $7,000 – $14,000 | Homes with existing ductwork | Most common choice | | Ductless mini-split | $4,000 – $12,000 | No ductwork / room additions | Zoned heating/cooling | | Cold-climate (CCHP) | $9,000 – $16,000 | Prairies, Northern Canada | Works to -25°C or lower | | Geothermal (ground-source) | $20,000 – $40,000 | Long-term, large properties | Highest efficiency, high upfront | | Hybrid (heat pump + furnace) | $8,000 – $14,000 | Best of both, auto-switching | Furnace backs up in deep cold | While considering a heat pump for a specific installation in Ontario, factors such as the local climate, available space, budget, and the existing HVAC infrastructure play crucial roles. Consulting with an HVAC professional can help determine the most suitable type of heat pump for your particular needs and circumstances. ## Heat Pump Vs Furnace: Is Heat Pump worth it? Now that, we have analyzed what a heat pump is and what are the various types of heat pumps, we shall now dive down into **Heat Pump Vs Furnace Comparison** and whether it is worth installing a heat pump instead of a [new furnace](https://urbantasker.com/blog/best-furnace-brands-in-canada-top-list) or even replace an existing furnace with heat pump. | Your Situation | Worth It? | Recommendation | |---|---|---| | High electricity, low gas prices | Maybe | Hybrid system or efficient furnace | | Want heating + cooling in one | Yes | Air-source heat pump | | Extreme cold region (Prairies/North) | Yes, with backup | Cold-climate or hybrid | | Generous provincial rebates (BC, QC, ON) | Strongly yes | Heat pump with stacked rebates | | No existing ductwork | Yes | Ductless mini-split | | Replacing both old furnace + AC | Yes | Single heat pump replaces both | | Tight upfront budget | Not yet | Efficient furnace now, heat pump later | ## Heat Pump vs. Furnace - Cost Benefit Analysis For the Cost benefit analysis of **Heat Pump vs Furnace** we will need to consider many factors: ## 1. Initial Investment: The first and foremost thing to check is the initial investment involved in the purchase and installation of a heat pump system. ### Cost of Heat Pump Installation: The initial cost includes the purchase and installation of the heat pump. This cost can vary based on the type, size, and efficiency of the heat pump. On average, expect to pay between $4,000 to $8,000 or more. Further, heat pumps are available in very different SEER ratings from 10-42, the cost goes up with SEER rating. in Canada SEER rating of upto 18 should be good enough, otherwise one is not able to recover the cost with the energy savings. Since you already might have AC or furnace in the home, this is the one time cost that most of the homeowners will need to shell out. However Government rebates in Canada for energy efficient homes can bring this upfront investment down to as low as 1500$. ## 2. Operating Cost: Heat pumps are overall more efficient than AC so in summer operating electricity cost will be lower in heat pump as compared to air conditioner. Similarly for temperatures lower than -5C, heatpumps will cost lower than natural gas required for operating natural gas furnace. ## 3. Energy Efficiency: [Heat pumps](https://urbantasker.com/blog/top-best-heat-pump-brands-in-canada) are generally more energy-efficient than traditional furnaces. They work by transferring heat from the outside to the inside during the heating season and vice versa during the cooling season. This efficiency can lead to lower monthly energy bills. ## 4. Savings: Potential Savings: While the initial investment might be higher, the long-term savings on energy bills could offset this cost. Heat pumps are known for their efficiency, especially in milder climates. ## 5. Furnace Use After Heat Pump Installation: One very contentious points with heat pumps these days is the efficiency of heat pumps in colder temperature. ### Supplemental Heating: In colder temperatures, especially during the winter months, a heat pump's efficiency may decrease. In such cases, a backup heating system, like a furnace, might be needed to maintain comfort. The frequency of furnace use depends on the specific conditions and the heat pump's capacity. These days there are heat pumps that can operate in very low temperatures but the cost of those heat pumps wont justify the hassle. When you live in an area where average temperature in winters goes below -10 C (which is most of Canada), you will inevitably require an supplemental heating since heat pump is either not that efficient at lower temperatures or is prohibitively expensive. On the other hand, furnace can operate on temperatures as low as -50 C without a hiccup! ### Dual-Fuel Systems: Some homeowners opt for dual-fuel systems, combining a heat pump with a furnace. This allows for optimal energy efficiency, as the system can switch between the heat pump and the furnace based on outdoor temperatures. ## 6. Heat Pump Maintenance and Lifespan: **Maintenance Cost:** Since the heat pump functions both as AC as well as furnace, the maintenance cost for one equipment will come out to be lower than two. With that said, though heat pumps generally require less maintenance, but regular check-ups are still necessary to ensure optimal performance. **Lifespan:** Heat pumps typically have a longer lifespan than traditional furnaces. This longevity can contribute to long-term cost savings. ## 7. Environmental Impact: If you are an eco-friendly person, by installing a heat pump you can contribute your part in doing good for the environment. ### Reduced Carbon Footprint: Heat pumps are considered more environmentally friendly as they don't burn fuel directly. This can be a significant factor for homeowners concerned about reducing their carbon footprint. ### Carbon Tax: Government of Canada applies Carbon tax on top of fossil fuel burning which includes the natural gas used in furnace. The carbon tax goes up every year which increases the cost of operating the furnace. However, it might be still few years where Carbon Tax would become prohibitive amount. Also, the carbon tax equation can also change with change in political environment. You may also like to know the **[Best Central Air Conditioner Brands in Canada](https://urbantasker.com/blog/best-central-air-conditioner-brands-in-canada)**. ## Heat Pump Rebates in Canada by Region (2026) Heat pump rebates continue to make energy-efficient upgrades more affordable for Canadian homeowners in 2026. Depending on your province and household eligibility, you may qualify for thousands of dollars in grants, rebates, or interest-free financing to reduce installation costs. ### Heat Pump Rebates by Region (2026) | Region / Program | Max Rebate (CAD) | Notes | |---|---|---| | Federal — Canada Greener Homes Loan | $40,000 (interest-free loan) | Pairs with provincial grants | | Ontario — Home Renovation Savings (HER+) | Up to $7,500 | Stackable with federal | | BC — CleanBC Better Homes | $6,000 – $11,000+ | Income-tested top-ups | | Quebec — LogisVert (Hydro-Québec) | Up to $6,700 | Strong heat pump focus | | Nova Scotia — Home Energy | $5,000 – $10,000 | Among Canada's most generous | | Alberta / Prairies | Varies (utility-based) | Check local utility programs | ## Heat Pump vs Furnace - Which is Better Option for Home Heating? Overall, there are both pros and cons of installing heat pumps instead of furnace in Canada. Its not a straight forward decision. Though if you are going to install a new appliance then considering heat pump is worthwhile. But, getting the an additional heat pump alongside furnace with additional investment requires a lot of thought!

Landscaping Costs and Estimates in Ontario, Canada - A Complete Pricing Guide 2026

If you’ve been thinking about upgrading your outdoor space this year, you’ve probably already noticed something — landscaping prices in Ontario aren’t exactly small. And the confusing part? Quotes can vary wildly. One contractor gives you a number that feels reasonable, another comes in way higher, and suddenly you’re not sure what’s normal anymore. So instead of guessing, let’s walk through what landscaping actually costs in Ontario in 2026. ## What Landscaping Costs Per Square Foot in Ontario? The majority of landscaping projects in Ontario continue to be charged by a basic formula: cost per square feet. As of 2026, here are the current rates being offered to homeowners: - Basic Landscaping: $4 to $12 per sq ft - Mid-range Landscaping: $12 to $25 per sq ft (this depends on the design and materials used) - High-end Landscaping: $25 to $50+ per sq ft Of course, these are not the actual rates. These are just the base rates. The actual figure will depend on what you are constructing and not the size of your lot. You may also like: **[Sizzling Trends: Top 5 Outdoor Living Projects Homeowners Love This Summer Season](https://urbantasker.com/blog/top-outdoor-living-projects-homeowners-love-summer-season-trends)** ## Basic Landscaping This is the kind of project where the goal is simple- clean things up and make the space usable. It usually includes: - Sod installation - Basic planting - Mulching and edging - Minor leveling For example, sod installation across Canada typically costs around $1.7 to $3.5 per sq ft, making it one of the most affordable upgrades you can do. This level works well if your yard just needs a refresh, not a redesign. ## Mid-Range Landscaping This is where landscaping starts to feel intentional. Instead of just fixing things, you’re shaping how the space is used. Typical additions: - Interlocking patios or walkways - Landscape lighting - Irrigation systems - Defined seating or garden areas For example, walkways in Ontario can range anywhere from $5 to $35 per sq ft, depending on whether you choose gravel, pavers, or natural stone. This is the range where most homeowners end up, especially in suburban areas. ## High-End Landscaping This is where budgets climb, and for good reason. You’re no longer just landscaping. You’re building an outdoor living space. Common features include: - Natural stone patios - Outdoor kitchens or fire pits - Retaining walls - Custom lighting and drainage systems A natural stone patio alone can cost $18 to $35 per sq ft installed, depending on the material and complexity. And that’s just one element of the project. ### Landscaping Element Costs (Per Feature) | Element | Cost (CAD) | Unit | Notes | |---|---|---|---| | Sod installation | $1.70 – $3.50 | per sq ft | Most affordable lawn upgrade | | Hydroseeding | $0.50 – $1.20 | per sq ft | Cheaper, takes weeks to grow | | Concrete walkway | $5 – $12 | per sq ft | Basic, durable | | Paver walkway | $15 – $25 | per sq ft | Mid-range, customizable | | Natural stone walkway | $25 – $35 | per sq ft | Premium look | | Interlocking patio | $18 – $35 | per sq ft | Most popular GTA choice | | Natural stone patio | $25 – $50 | per sq ft | High-end | | Wood deck | $35 – $60 | per sq ft | Cedar / pressure-treated | | Composite deck | $50 – $90 | per sq ft | Premium, low maintenance | | Retaining wall | $40 – $90 | per linear ft | Depends on height/material | | Landscape lighting | $200 – $500 | per fixture | Includes wiring + transformer | | Irrigation (sprinkler) | $2,500 – $6,000 | full system | 5 – 8 zones typical | | Tree planting (mature) | $300 – $1,500 | per tree | 8+ ft, includes labour | | Fire pit (built-in) | $1,500 – $5,000 | each | Stone or paver | | Outdoor kitchen | $8,000 – $25,000+ | full setup | Cabinets, grill, counters | _Costs are subject to change based on market conditions, material availability, and labor rates. It is advisable to obtain multiple local quotes before finalizing your budget._ ## Total Landscaping Costs in Ontario - A Reality Check If we translate that per square foot amount into actual budgetary terms, this is what we’re looking at: - Small projects: $1,500-$5,000 - Medium projects: $5,000-$20,000 - Large projects: $20,000-$50,000+ ### Landscaping Tiers at a Glance | Tier | Cost / Sq Ft (CAD) | What's Included | Total Cost (Avg. Yard) | Timeline | |---|---|---|---|---| | Basic | $4 – $12 | Sod, basic planting, mulching, edging, minor leveling | $1,500 – $5,000 | 2 – 5 days | | Mid-Range | $12 – $25 | Interlocking patio, walkways, lighting, irrigation, defined garden beds | $5,000 – $20,000 | 1 – 2 weeks | | High-End | $25 – $50+ | Natural stone patio, outdoor kitchen, fire pit, retaining walls, custom drainage | $20,000 – $50,000+ | 3 – 6 weeks | | Luxury / Custom | $50 – $100+ | Pool decks, water features, full outdoor living rooms, mature trees | $50,000 – $150,000+ | 6 – 12 weeks | _Costs may vary depending on market trends, availability, and labor charges. Always check with a few local contractors before budgeting._ You may also like: **[7 Ways to Prepare Your Home for Summer Season in Canada](https://urbantasker.com/blog/ways-to-prepare-your-home-for-summer-season-canada-maintenance)** ## Why Landscaping Costs Vary So Much? This is where most people get caught off guard. Two homes with the same yard size can have completely different costs — and it comes down to a few key factors. Materials Make a Huge Difference: Concrete is affordable. Pavers cost more. Natural stone pushes you into premium pricing. Even small upgrades in material choice can shift your budget by thousands. Labour Isn’t Cheap in Ontario: Labour, which involves the process of excavation, installation, and finishing, accounts for a substantial percentage of the total expenditure. Labour costs are also relatively high in Toronto, given the demand and supply. The Condition of Your Yard: The costs will remain relatively low if your yard is already flat and well-drained. However, if the yard has to be graded, if the drainage has to be improved, then these costs will be incurred before the actual work of landscaping begins. Design Complexity: A straight walkway is simple. A curved patio with multiple levels, lighting, and retaining walls? That’s where costs rise quickly. ## Extra Costs People Often Forget This is where budgets quietly increase. In 2026, additional costs may be: - Design consultation: $75 to $150 per hour - Soil testing or survey: $600 to $3,000+ - Irrigation systems: $2,500 to $6,000 These may not be included in initial quotes. ### Hidden & Extra Costs | Extra Cost | Typical Cost (CAD) | When It Applies | |---|---|---| | Design consultation | $75 – $150 / hour | Complex layouts | | Full landscape design plan | $1,500 – $5,000 | Larger projects | | Soil testing | $300 – $800 | Before planting / drainage work | | Site survey | $600 – $3,000 | If property lines unclear | | Grading / leveling | $1,500 – $6,000 | Sloped or uneven yards | | Drainage / French drain | $2,000 – $8,000 | Flood-prone yards | | Tree removal | $400 – $2,500 / tree | Existing mature trees in the way | | Disposal / haul-away | $300 – $1,200 | Existing patio / debris | | Building permit | $150 – $500 | Decks, retaining walls > 4 ft | | Spring "rush" surcharge | 10 – 20% | Booking April – June | _Estimated costs can fluctuate due to changes in market dynamics, supply availability, and labor pricing. Be sure to verify with multiple local quotes for accurate planning._ ## How to Keep Your Landscaping Budget Under Control? You don’t need to cut corners — just be intentional. A few practical tips: - Try breaking the task up in phases, as opposed to doing it in one go - Target areas where the object will be used intensively, e.g., patio, sitting area - Consider a mix of high-end and economy products - DIY where possible, e.g., planting, clean-up Such small decisions can help keep costs from running out of control. ### Landscaping Costs in Ontario Landscaping in Ontario in 2026 isn’t cheap — but it’s also not as unpredictable as it first seems. Once you understand the cost per square foot and what drives it, things start to feel more manageable. Because in the end, it’s not really about spending the least, it’s about spending smart and ending up with a space you’ll actually use.

How much does Fence Installation Cost in Greater Toronto Area or GTA in Ontario, Canada?

If you casually ask around about fence costs in the GTA, you’ll quickly notice that no two people seem to give the same number, and it’s not because anyone is being vague on purpose; it’s just that a lot of the real factors that affect pricing don’t usually come up in a quick conversation. One person might say they got their fence done for a few thousand, while someone else swears theirs cost almost double, even though, at a glance, both yards look pretty similar, which is exactly where the confusion usually starts. The easiest way to make sense of it, honestly, is to stop thinking of it as a fixed project and instead think in terms of cost per linear foot, because that’s how most contractors in Ontario actually calculate things behind the scenes. ## Average Fence Cost in the GTA So, for instance, a fencing contract in the GTA may cost anywhere between $40 to $100 for every linear foot, though that’s also uncertain because it doesn’t really clarify the real cost for that sort of broad range. If you try to relate that to a real-world scenario, a simple backyard fence may end up costing anywhere between $4,000 to $10,000 for a length that may be around 100 feet. But very rarely does it stay that straightforward. ## What Really Affects the Final Price? At first, it feels like fencing should be simple. You pick a material, measure the boundary, and that’s it. But once you start actually planning it, you realize there are a lot of small decisions layered into it. Material is the obvious one, but even that isn’t just about cost , it’s also about how much effort you want to put in later. A lot of people start with pressure-treated wood because it keeps the initial price lower, and it works fine, especially for privacy. But over time, it doesn’t always age the way people expect unless you maintain it. Then there’s cedar, which tends to come up when someone says they want something that looks a bit nicer without going too far into premium territory. It’s not cheap, but it’s also not the most expensive option, so it ends up being a middle ground for a lot of homes in the GTA. Vinyl is a different kind of decision altogether. It’s less about how it looks on day one and more about not having to think about it again for years. Some people love that, others don’t like the upfront cost. And then you have composite, which is usually where the conversation shifts from “what’s affordable” to “what’s going to last the longest,” because that’s really what you’re paying for there. On the opposite end, chain link shows up mostly when budget matters more than anything else, or when the goal is just to mark a boundary rather than create a private space. You may also like: **[Sizzling Trends: Top 5 Outdoor Living Projects Homeowners Love This Summer Season](https://urbantasker.com/blog/top-outdoor-living-projects-homeowners-love-summer-season-trends)** ## Real Project Cost Examples This is probably the part that surprises people the most. Take a property that needs around 150 feet of fencing. Nothing unusual. One homeowner keeps it simple, chooses a basic material, and the total comes out somewhere around $6,000 to $9,000, which feels reasonable. Another person, same size yard, goes for better materials and a cleaner finish, and suddenly it’s closer to $12,000 or even $15,000, without doing anything extreme. And then someone else adds a few upgrades here and there — maybe a nicer layout, maybe a different material — and it crosses $20,000, which feels like a big jump until you look at what actually changed. ### Total Fence Cost by Length & Material | Yard Perimeter | Pressure-Treated | Cedar | Vinyl | Composite | Chain Link | |---|---|---|---|---|---| | 50 linear ft | $1,500 – $2,750 | $2,250 – $3,750 | $2,250 – $4,250 | $2,750 – $4,750 | $2,000 – $3,250 | | 100 linear ft | $3,000 – $5,500 | $4,500 – $7,500 | $4,500 – $8,500 | $5,500 – $9,500 | $4,000 – $6,500 | | 150 linear ft | $4,500 – $8,250 | $6,750 – $11,250 | $6,750 – $12,750 | $8,250 – $14,250 | $6,000 – $9,750 | | 200 linear ft | $6,000 – $11,000 | $9,000 – $15,000 | $9,000 – $17,000 | $11,000 – $19,000 | $8,000 – $13,000 | | 300 linear ft | $9,000 – $16,500 | $13,500 – $22,500 | $13,500 – $25,500 | $16,500 – $28,500 | $12,000 – $19,500 | _Costs may vary depending on market trends, availability, and labor charges. Always check with a few local contractors before budgeting._ ## Labour Charges A lot of people assume most of the money goes into materials, but that’s not really how it plays out, especially in the GTA. The actual installation takes time, and it’s not just about putting posts in the ground. There’s measuring, digging, leveling, making sure everything lines up properly so it doesn’t shift over time, especially with weather changes. And because skilled labour is in demand, that part of the cost adds up faster than people expect. ## Condition of Yard This usually comes up after someone visits the site. A yard that looks normal at a glance might have uneven ground, tougher soil, or limited access, and all of that changes how easy the job is to do. If everything is flat and open, things move faster. If not, it takes more time, and that shows up in the final number. You may also like: **[How much does it cost to install Sliding Patio Door in Canada?](https://urbantasker.com/blog/how-much-does-it-cost-to-install-sliding-patio-door-canada)** ## Other costs This is where budgets quietly stretch. You add a gate, which seems obvious, but it still adds cost. You may remove an old fence, which wasn’t part of the original plan. Or, you may adjust something slightly during installation. Individually, none of these feels like a major decision, but together, they can shift the total more than expected. ### Common Add-On Costs (Often Hidden in Initial Quotes) | Extra / Add-on | Typical Cost (CAD) | Notes | |---|---|---| | Standard gate (4 ft) | $300 – $700 | Single-swing | | Double gate / driveway | $800 – $1,800 | For vehicle access | | Old fence removal | $4 – $10 / linear ft | Includes haul-away | | Fence post anchors / concrete | $30 – $80 / post | More posts for windy areas | | Tree / root removal | $200 – $1,500 | If blocking the fence line | | Building permit (Toronto) | $200 – $500 | If fence over 2 m / property line | | Land survey | $600 – $1,500 | If property line disputed | | Sloped/uneven yard surcharge | 10 – 30% extra labour | Stepping or racking required | | Stain / paint (post-install) | $1.50 – $4 / sq ft | Adds 5+ years to wood | _Costs are subject to change based on market conditions, material availability, and labor rates. It is advisable to obtain multiple local quotes before finalizing your budget._ ## Total Costs Let's look at the total cost for fence installation: ### Fence Materials Compared | Fence Material | Cost / Linear Ft (CAD) | Lifespan | Maintenance | Best For | |---|---|---|---|---| | Pressure-Treated Wood | $30 – $55 | 10 – 15 yrs | Yearly stain/seal | Budget-friendly privacy | | Cedar Wood | $45 – $75 | 15 – 25 yrs | Stain every 2 – 3 yrs | Natural look + durability | | Vinyl (PVC) | $45 – $85 | 25 – 40 yrs | Wash occasionally | Low maintenance, clean look | | Composite | $55 – $95 | 25 – 30 yrs | Minimal | Modern, premium aesthetics | | Chain Link | $40 – $65 | 15 – 25 yrs | Minimal | Boundary marking, dog runs | | Aluminum / Wrought Iron | $55 – $110 | 30 – 50 yrs | Repaint every 10 yrs | Decorative, security | | Bamboo | $25 – $45 | 5 – 10 yrs | Yearly oil treatment | Eco-friendly, temporary | _Estimated costs can fluctuate due to changes in market dynamics, supply availability, and labor pricing. Be sure to verify with multiple local quotes for accurate planning._ ## Picking the Right Fence for Your Space After going back and forth on options, most people don’t actually pick the cheapest or the most expensive route. They land somewhere in between — something that looks good enough, lasts long enough, and doesn’t feel like they overspent. And that’s usually the point where the pricing starts to make sense, because it’s no longer just a number; it’s tied to what they actually want out of the space. ### Cost of Fencing in the GTA Fence installation in the GTA isn’t as predictable as people expect at the beginning, but it’s also not random once you start looking at what goes into it. It’s really just a combination of choices — material, labour, and the condition of your yard — all coming together to shape the final cost. Once you see it that way, the quotes you get stop feeling confusing and start feeling a bit more logical.

Summer's Hottest 5 Tasks: What Everyone’s Posting on UrbanTasker?

The most awaited season of the year is here. The long and sunny days are perfect for homeowners to execute all the repairs and renovations that they have been planning for the last few months. This season helps you to carry out the tasks of roofing, fencing, and painting, which is next to impossible to carry out in the snow-covered months. With the rise in home improvement projects, **UrbanTasker** has been used in full swing. If you recently logged in to this platform, you may have noticed tons of service requests. A large number of homeowners are posting about their requirements every single day. This reflects how people are considering to transform their living space. ## Canada’s Top Home Tasks – See What’s Trending on UrbanTasker If you are planning to do some upgrades in summer but are unsure about what will be the best one, this blog is for you. **Let’s dive into the most in-demand tasks trending on UrbanTasker.** ## 1. Painting Projects There is something about the summer season. It brings back apricots, berries, nectarines, and the desire for a fresh coat of paint. The weather is suitable for this type of task as paint can be dried faster. Here, in UrbanTasker, homeowners are flooding with requests for both interior and exterior painting. Most of the homeowners are following current trends while requesting quotes. The colour palettes of warm and neutral are the most popular choices. Along with walls, requests for deck and fence painting are also posted. ## 2. Gazebo and Awning Installations The season of evening barbecue parties and outdoor brunches is here. But, do you want to sip your americano in the scorching heat? It’s a big no, right? That’s where Gazebo Installations come in. A large number of users in UrbanTasker are requesting quotes from contractors for Gazebo and Awning Installations. Global warming is gradually warming the Planet Earth. Thus, Gazebos are becoming a necessity and not a luxury. People are currently choosing wooden gazebos, retractable patio covers, and pergolas in their lawn renovations. This improvement adds to the look of your backyard and presiding comfort, as well as UV Protection. The best part is that the process of finding the right professional for installation gets easier than ever through UrbanTasker. A large number of people are tuning in to it every day to get their existing structures repaired or install a new one. ## 3. Landscaping The concept of landscaping has changed over the past few years. It is not about mowing gardens anymore. Summer is the best time to flaunt beautiful flowers in the garden. Some people prefer a complete garden renovation, while others prefer quick flower beds. On UrbanTasker, there is a huge rise in the number of posts on landscaping jobs. The contractors for such tasks are in high demand recently. The most popular services on this platform for landscaping are hardscaping, tree trimming, flower-bed setups, and lawn aeration. These practices promote sustainability and also make the lawn beautiful. You may also like to explore **[Hidden Costs of Home Renovations in Canada: What Nobody Tells You?](https://urbantasker.com/blog/hidden-costs-of-home-renovations-in-canada-repair-cost)** ## 4. Cleaning The Summer Season brings the vibe of a fresh home. The requirements for cleaning and home maintenance professionals have spiked a lot. The demands of garage cleaning, floor and roof cleaning, and window washing are growing in these months. Some people are also looking for a post-renovation deep cleaning. Cleaning and maintenance are basic requirements for a comfortable home. No one wants to sit on a sofa covered with dust. So, calling a professional will be the perfect choice to make your home squeaky clean. They can also help to declutter your house if required. Summer might be buzzing with renovation and repair tasks, but smart homeowners know that every season brings its own checklist. From rain to snow, it pays to stay prepared — check out these **[seasonal home maintenance tasks](https://urbantasker.com/blog/seasonal-home-maintenance-tasks-you-should-not-ignore)** you shouldn’t ignore to keep your home in top shape year-round. ## 5. Roofing and Flooring The snow-covered winters make it impossible to perform any upgrades on the roof. As soon as Summer arrives, homeowners execute the tasks on the roof and floors that they have been planning all year long. As a result, these tasks are trending in UrbanTasker in recent months. Roofing or roofs are a very important part of your house. It is necessary to protect your home against thunderstorms, hailstorms, and extreme snowfall. Demands have increased on tasks like leak repairs and shingle replacements. Some Canadians are even doing a metal roof upgrade. Floors are essential to maintain a strong framework. It also gives an aesthetic appeal. Many people are reconstructing the floors of their kitchens, basements, and living rooms. The trending projects in the platform are setting up tiles in the bathroom and kitchen, and the installation of vinyl plank and hardwood floors. These tasks can make your floor look beautiful and sturdy. ### Your Summer, Powered by UrbanTasker Summer is the best time of the year to execute all types of home improvement tasks. The paintings dry fast, gazebos allow you to have a peaceful space to relax under the sun, roofs can be repaired or upgraded because there is no snow, and beautiful flowers fill up the lawn. Renovations can be a pleasure and add comfort to your living space. UrbanTasker has been flooded with requests for tasks like- Painting, Roofing, Flooring, Gazebo Installation, Cleaning, and Landscaping. This is a go-to platform for homeowners as it can bring their ideas to life. You don’t have to call multiple contractors and get their quotes anymore. UrbanTasker helps you connect with skilled professionals all in one place. You can simply **[Post Your Task and Receive Multiple Quotes](https://urbantasker.com/tasks/create)**. The best part is that this service costs you nothing! You don’t have to worry about your living room, power-washing your driveway, or creating the backyard hangout of your dreams. UrbanTasker can help you get it all done. **Start your next summer project today. Post your task. Book your professional. And let UrbanTasker take care of the rest.**

BeautiTone Paint Reviews: Canadian-Made Quality Paints for Your Home

In today's economic climate, Canadian consumers are increasingly prioritizing locally made products. This shift is particularly evident in the home improvement sector, where BeautiTone Paint stands out as a leading choice. As Canada's #1 Canadian-owned and Canadian-made retail paint brand, **BeautiTone** offers quality, affordability, and a commitment to local manufacturing. ## Quick Answer: Is BeautiTone Paint Worth It? **Yes.** BeautiTone is Canada's #1 Canadian-owned retail paint brand, manufactured 100% in Burford, Ontario by Home Hardware Stores Limited. It's sold exclusively at Home Hardware locations and consistently ranks among the best-performing paints in independent lab tests — particularly the **Designer Series**, which uses a 100% acrylic formula and competes head-to-head with premium brands like Benjamin Moore Regal Select. ### Beautitone Paint - At a glance: - **Price range (3.78L can):** ~$40 – $75 CAD depending on line - **Top product line:** Designer Series (interior) and Weather Shield (exterior) - **Eco-friendly option:** Natura / Pure — ultra-low VOC, virtually odourless - **Best for:** Canadian homeowners who want quality at a mid-tier price and prefer to support a local brand - **Where to buy:** Exclusively at Home Hardware, Home Building Centre, and Home Hardware Building Centre stores - **2026 Colour of the Year:** 'Muse' (TR26-4-3) — a refined, earthy hue ## Is BeautiTone Truly Canadian? First of all, let's answer this question. Yes, BeautiTone is proudly Canadian. It is a popular Canadian-owned and Canadian-made retail paint brand in the country. Owned by Home Hardware Stores Limited, a 100% Canadian company, BeautiTone's entire paint production takes place in Burford, Ontario, where it operates one of North America's most advanced paint manufacturing and testing facilities. This local ownership and manufacturing not only ensure consistent quality and innovation but also support Canadian jobs and the national economy. In a market often flooded with imported products, BeautiTone stands out as an authentic, homegrown brand that Canadians can trust. ## Made in Canada: BeautiTone's Commitment to Quality BeautiTone Paint & Home Products operates from a state-of-the-art facility in Burford, Ontario. This modern plant and laboratory are among the most advanced in North America, ensuring high-quality production standards. The company's dedication to excellence is evident in its rigorous quality control processes, with each batch undergoing multiple checks to guarantee consistency and performance. BeautiTone's product range includes water-based and solvent-based paints, aerosols, and cleaning products. Notably, their Natura line is highly regarded for its environmental considerations. All products are exclusive to Home Hardware stores across Canada, reinforcing the brand's Canadian identity. You may also like to discover **[List of Canadian Hardware Stores](https://urbantasker.com/blog/list-of-canadian-owned-home-hardware-stores-local-businesses-canada)** ## BeautiTone 2026 Colour of the Year: 'Muse' In September 2025, BeautiTone announced **'Muse' (TR26-4-3)** as its 2026 Colour of the Year — a refined, earthy hue inspired by the depth of classical art. **About 'Muse':** - A grounded, sophisticated tone that works in living rooms, dining rooms, and bedrooms - Pairs well with warm whites, terracotta, and aged brass - Available across BeautiTone's Designer, Signature, Pure, and PRO paint lines - Part of a 7-colour trend palette plus 4 supporting neutrals The 2026 palette draws inspiration from vintage-inspired pigments while remaining versatile enough for modern Canadian homes. Whether you're refreshing a single accent wall or planning a full repaint, 'Muse' and the supporting palette are worth a look. *'Muse' and the full 2026 trend palette are available exclusively at Home Hardware, Home Building Centre, and Home Hardware Building Centre stores across Canada.* ## BeautiTone vs Other Top Paint Brands in Canada How does BeautiTone really compare to the other paint brands lining Canadian shelves? Here's an honest side-by-side. | Brand | Origin | Price (3.78L premium line) | Top Line | Eco Line | Where to Buy | 100% Canadian-Owned | |---|---|---|---|---|---|---| | **BeautiTone** | Canadian (Burford, ON) | $60 – $75 | Designer Series | Natura / Pure | Home Hardware | Yes | | Benjamin Moore | US-based, sold in Canada | $80 – $110 | Regal Select / Aura | Natura | Independent dealers | No | | Behr | US (Home Depot exclusive) | $55 – $80 | Marquee / Dynasty | Premium Plus | Home Depot Canada | No | | Cloverdale Paint | Canadian (Surrey, BC) | $65 – $90 | Horizon | EcoLogic | Cloverdale stores | Yes | | Sherwin-Williams | US-based | $75 – $100 | Emerald / Cashmere | Harmony | SW Canadian stores | No | | CIL (Dulux) | Owned by PPG (US) | $50 – $75 | Smart3 | Lifemaster | Canadian Tire, Home Depot | No | **Verdict:** BeautiTone Designer Series delivers performance comparable to Benjamin Moore Regal Select at roughly 25–30% lower cost — and your dollars stay in Canada. The trade-off is you can only buy it at Home Hardware (no Home Depot, no Canadian Tire, no big-box presence). Want to know more about other Canadian paints? Check out our guide on **[Cloverdale Paint](https://urbantasker.com/blog/is-cloverdale-paint-canadian-paints-made-in-canada)** — another proudly Canadian brand worth considering. ## BeautiTone Product Lines Compared (2026) BeautiTone makes paint for every project — from a single accent wall to a full exterior repaint. Here's how the main lines stack up. | Product Line | Best For | Finish Options | VOC Level | Price Range (3.78L) | Coverage | |---|---|---|---|---|---| | Designer Series | Premium interior + exterior, top-rated in lab tests | Matte, Suede, Satin (int.) / Silk, Suede (ext.) | Low | $60 – $75 | 350 – 400 sq ft | | Signature Series | DIY enthusiasts, all-purpose | Flat, Velvet, Eggshell, Pearl, Semi-gloss, Gloss | Low | $45 – $60 | 350 – 400 sq ft | | Natura / Pure | Eco-conscious, families, nurseries | Flat, Eggshell, Velvet, Pearl | Ultra-low VOC | $55 – $70 | 350 – 400 sq ft | | Weather Shield | Exterior wood, siding, trim | Flat, Velvet, Semi-gloss | Low | $55 – $70 | 300 – 400 sq ft | | Wood-Shield Stain | Decks, fences, exterior wood | Semi-transparent, Solid | Varies | $50 – $65 | 200 – 400 sq ft | | Pro 300 | Contractors, high-volume jobs | Ultra-flat, Velvet, Pearl, Eggshell, Semi-gloss | Low | $40 – $55 | 350 – 400 sq ft (MPI approved) | | Barn Paint | Sheds, fences, agricultural buildings | Flat exterior latex | Low | $40 – $55 | 200 – 350 sq ft | *Prices are approximate Canadian retail and may vary by Home Hardware location and tint depth.* ### Buying A Paint? Pro Tips: Understanding VOC Labels **(VOC stands for Volatile Organic Compound)** Not all "low-VOC" paints are equal. Here's what the labels actually mean: - **Low-VOC:** Less than 50 g/L of VOCs (the industry-accepted standard, in line with MPI Green Performance, LEED, and SCAQMD requirements) - **Zero-VOC:** Less than 5 g/L of VOCs in the *base paint* **Important catch:** "Zero-VOC" refers only to the base paint. Adding tint — especially deep or dark colours — can add 5 to 150 g/L of VOCs back into the can. The deeper the shade, the more VOCs in your final mix. - **For nurseries, kids' rooms, or anyone chemically sensitive,** stick with lighter tints in BeautiTone's **Natura / Pure** line. - Ventilate well during and 48–72 hours after painting - Look for third-party certifications like **Green Seal**, **Greenguard Gold**, or **MPI X-Green** on the label — these go beyond the basic "low-VOC" claim - Verify the paint also avoids other harmful compounds like formaldehyde, benzene, and phthalates. Canada's federal VOC cap for flat interior paint is 100 g/L — so even "regular" Canadian paints are dramatically lower in VOCs than they were 15 years ago. But for the most sensitive applications, low-VOC + lighter tint + good ventilation is the winning combination. ## Which BeautiTone paint should you choose? - **Repainting a living room or bedroom:** Designer Series in Eggshell or Suede - **Painting a kid's room or nursery:** Natura / Pure (ultra-low VOC, virtually no smell) - **High-traffic areas (hallways, kitchens, bathrooms):** Designer Series in Pearl or Semi-gloss - **Tackling a full house yourself on a budget:** Signature Series - **Painting your deck or fence:** Wood-Shield Stain - **Hiring a pro for a multi-room job:** Pro 300 (most contractors already stock it)These lines offer various finishes, including flat, eggshell, velvet, semi-gloss, and gloss, ensuring versatility for any project. You can use the "Made in Canada (with domestic/import materials)" and "Product of Canada" filters to shop local products. While the **[paint pricing](https://urbantasker.com/blog/cost-to-paint-outside-of-house-exterior-painting-canada)** plays a role, it's the quality that truly makes all the difference. What do you think? ## Why Canadians Are Choosing BeautiTone? The "Buy Canadian" movement has reshaped how Canadians shop for everything from groceries to home improvement supplies. With ongoing trade tensions and tariffs affecting US imports, more homeowners are actively choosing locally manufactured products — and paint is no exception. **Here's what makes BeautiTone stand out:** 1. **Truly Canadian-made.** Every can is mixed, tinted, and packaged in Burford, Ontario — not just "designed in Canada" or "prepared in Canada." 2. **Quality that competes with premium imports.** The Designer Series consistently ranks alongside Benjamin Moore Regal Select in independent lab tests, often at 25–30% lower cost. 3. **Eco-friendly options.** The Natura / Pure line offers ultra-low VOCs — important for families with kids, pets, or anyone sensitive to fumes. 4. **Backed by Canada's largest dealer-owned hardware retailer.** Home Hardware has 1,100+ stores nationwide, so finding it (and getting expert advice) is easy. 5. **Supports Canadian jobs.** From the Burford plant workers to the independent Home Hardware dealers, your purchase keeps money circulating in the Canadian economy. If you're already committed to supporting Canadian brands, BeautiTone is one of the easiest paint choices to feel good about. Retailers have noted this change in consumer behaviour, with shoppers actively seeking out products that support the local economy. This movement is further reinforced by government initiatives and public campaigns promoting Canadian goods. ## How Much BeautiTone Paint Do You Need? A standard 3.78L (1 gallon) can of BeautiTone covers approximately **350–400 square feet** of wall with one coat. Most projects need two coats. Here's a quick reference for typical Canadian homes: | Room Size | Wall Area (Approx.) | BeautiTone Cans Needed (2 coats) | Estimated Paint Cost (Designer Series) | |---|---|---|---| | Powder room / small bathroom | 150 sq ft | 1 can | $60 – $75 | | Bedroom (10 × 12 ft) | 350 sq ft | 2 cans | $120 – $150 | | Living room (15 × 20 ft) | 600 sq ft | 3 – 4 cans | $180 – $300 | | Whole-house interior (avg. 1,800 sq ft home) | 4,500 sq ft | 12 – 14 cans | $720 – $1,050 | | Exterior of a 2-storey detached house | 2,500 sq ft | 7 – 8 cans (Weather Shield) | $385 – $560 | *Add 10–15% extra for textured walls, deep colour changes (light → dark or vice versa), or if priming is needed.* Painting an entire home is doable as a DIY project, but most Canadians find that for anything bigger than a single room, hiring a professional pays off — better finish, no ladder rentals, no wasted paint, and the job is done in a day or two instead of a weekend. **[Post your painting task on UrbanTasker](https://urbantasker.com/tasks/create)** to get free quotes from local painters who work with BeautiTone and other quality brands. ## BeautiTone Paint: The Final Verdict No doubt, BeautiTone Paint exemplifies the qualities Canadian consumers are seeking: high-quality, locally made, and environmentally conscious products. In an era of economic uncertainty and shifting trade dynamics, choosing BeautiTone supports Canadian industry and aligns with the growing trend of economic patriotism. The next time you plan to go for paint shopping, remember to explore the wide range of Beautitone paints collection at your nearest store. If you're a Canadian homeowner who wants quality paint at a reasonable price — and you'd rather your dollars stay in Canada than fund a US-owned big-box chain — BeautiTone is genuinely hard to beat. The Designer Series competes with the best on the market, the Natura / Pure line is excellent for families, and the Weather Shield range is built for Canadian winters. **The catch?** You can only buy it at Home Hardware. So if you don't have one nearby, that's a real limitation. For most homeowners, though, BeautiTone hits the sweet spot of quality, price, and provenance — and Home Hardware's network is wide enough that finding a store is rarely a problem. **Disclaimer:** This article is provided for informational purposes only. UrbanTasker has no affiliation with the brands or products mentioned in this article. We are not endorsing or recommending any of them, and we receive no payment or compensation for including them in this list. All information is general and based on publicly available sources at the time of writing. Please follow due diligence and do your own research before making any purchasing decisions. ### Need help with your painting project? Choosing the paint is the easy part. The hard part is the actual painting — taping, prepping walls, cutting in, two coats, cleanup. For a single bedroom, DIY makes sense. For anything bigger, a professional painter can finish in a day what would take you a weekend. **[Post your painting task on UrbanTasker](https://urbantasker.com/tasks/create)** to get free quotes from local painters in your area. Most painters work with BeautiTone, Benjamin Moore, and other quality brands — and they'll handle everything from prep to final touch-up. *Have you used BeautiTone? What's your favourite line or colour? Let us know in the comments — we'd love to hear your experience.* By selecting BeautiTone Paint, you're not only enhancing your home but also contributing to the strength and resilience of Canada's economy. What's your feedback in the same? Do you know about any other Paints made in Canada? Do share with us to keep adding to our list of Canadian products.

Pergola vs. Gazebo - What is the Difference? Which is Better?

When it comes to enhancing your outdoor space, then the pergolas and gazebos stand out as popular choices. These structures not only add beauty to your backyard but also comes with many functional advantages. But how are they different from each other, and which one should I choose? If you have such questions, and don't worry, all your **Pergola vs. Gazebo queries will find their answers right here**. ## Pergola vs Gazebo: Which Outdoor Structure Is Better for Your Home? Both pergolas and gazebos can completely transform an outdoor space, but they serve different purposes. While pergolas create an open, stylish extension of a patio or garden, gazebos offer stronger shelter, privacy, and year-round functionality for outdoor living. ### Pergola vs Gazebo Head-to-Head | Feature | Pergola | Gazebo | |---|---|---| | Roof | Open slats / partial cover | Fully covered, solid roof | | Shade | Partial (climbing plants help) | Full shade & rain protection | | Shape | Usually rectangular, attached or freestanding | Usually octagonal/round, freestanding | | Sides | Open | Open or partially railed | | Cost (installed, CAD) | $3,000 – $10,000 | $4,000 – $15,000 | | Best use | Walkways, patios, garden accent | Outdoor dining, hot tubs, gatherings | | Weather protection | Limited | Strong | | Installation time | 1 – 3 days | 2 – 5 days | | Adds resale value | Yes (moderate) | Yes (strong focal point) | ## What is a Pergola? Pergolas are open-air structures that typically consist of vertical posts or pillars that support cross-beams and a durable open lattice, creating a partially shaded area. The primary purpose of a pergola is to define and accentuate outdoor spaces, providing an inviting area for relaxation, dining, or entertainment. ### 1. Design and Aesthetics: Pergolas are known for their elegant and minimalist design. They offer a sense of openness and airiness, creating a visually appealing structure that complements various architectural styles. The open lattice design allows for filtered sunlight, casting a beautiful play of light and shadow on the ground. ### 2. Customization and Flexibility: One of the key advantages of pergolas is their flexibility in design and customization. You as a homeowner can choose the material you want, like wood, vinyl, or metal. You can also choose the size, shape, and color to match your backyard and other outdoor furniture. ### 3. Functionality: While pergolas provide some degree of shade, they are not fully enclosed structures. This makes them ideal for individuals who enjoy a balance of sunlight and shade, allowing the beauty of the surrounding landscape to be appreciated. Pergolas are perfect for climbing plants like vines and roses, creating a natural, green ceiling. ## What is a Gazebo? Gazebos, on the other hand, are freestanding, octagonal or hexagonal structures with a fully enclosed roof and open sides. They usually have fancy touches like railings and decorations, making them look more classic and fancy compared to pergolas. ### 1. Design and Aesthetics: Gazebos are known for their distinct, classic designs. The enclosed roof provides more substantial shelter, making gazebos a great option for those seeking a fully covered structure that offers protection from the elements. ### 2. Enclosed Space: Unlike pergolas, gazebos are fully enclosed, providing a more intimate and sheltered space. This makes them an excellent choice for those looking to create a cozy outdoor room, shielded from direct sunlight, rain, or even pesky insects. ### 3. Material and Construction: Gazebos are often constructed with durable materials such as wood, vinyl, or metal. The choice of material can impact the overall maintenance requirements and longevity of the structure. Some gazebos may also come with built-in seating or benches, enhancing their functionality. You may also like to know **[All Season Lawn Care Tips](https://urbantasker.com/blog/all-season-lawn-care-tips-canada-spring-summer-ideas)** and enjoy a lush and green lawn. ## Pergola vs. Gazebo: Key Differences to Know Now that we are familiar with the individual characteristics of pergolas and gazebos, let's compare them based on various factors to give a more clear idea: ### 1. Purpose and Use: - **Pergolas**: Pergolas are ideal for creating an open and inviting space for outdoor dining, relaxation, or entertaining. They provide a perfect blend of sunlight and shade. - **Gazebos**: Gazebos are well-suited for creating a fully enclosed space. They offer more shelter and protection. **[Classic Gazebos](https://urbantasker.com/article/estimated-costco-gazebo-installation-cost)** are perfect for intimate gatherings or as a quiet retreat. ### 2. Design and Style: - **Pergolas**: When it comes to design then pergolas are modern and offer more customization to match individual tastes and existing outdoor aesthetics. - **Gazebos**: Feature classic, ornate designs that add a touch of elegance to the outdoor space. The enclosed structure provides a more formal atmosphere. You may also like to discover the **[Sizzling Trends: Top 5 Outdoor Living Projects Homeowners Love This Summer Season](https://urbantasker.com/blog/top-outdoor-living-projects-homeowners-love-summer-season-trends)** ### 3. Flexibility and Customization: - **Pergolas**: Highly customizable in terms of size, shape, and materials. Suitable for those who appreciate a personalized touch. - **Gazebos**: While customization options exist, gazebos may have more predefined designs due to their enclosed nature. ### 4. Shelter and Protection: - **Pergolas**: Offer partial shade but do not provide complete protection from the elements. - **Gazebos**: Provide full shelter, protecting occupants from direct sunlight, rain, and insects. ### 5. Durability Gazebos are generally more durable than pergolas. This is because gazebos have solid roofs and sides, while pergolas have open or partially covered roofs. Gazebos are also typically made from materials like wood or metal. Pergolas are often made from lighter-weight materials, such as vinyl or aluminum. ### 6. Cost Pergolas are generally less expensive than gazebos. This is because pergolas are simpler structures and require less material. Gazebos are more complex structures and require more material, which results in a higher cost. Don't miss to read **[How much does it cost to install a Gazebo in Canada?](https://urbantasker.com/blog/how-much-does-it-cost-to-install-gazebo-in-canada)** ### Material & Cost Comparison | Material | Cost (Installed, CAD) | Lifespan | Maintenance | |---|---|---|---| | Pressure-treated wood | $3,000 – $7,000 | 10 – 15 yrs | Stain every 2 – 3 yrs | | Cedar | $4,500 – $9,000 | 15 – 25 yrs | Stain every 2 – 3 yrs | | Aluminum | $4,000 – $9,000 | 25 – 40 yrs | Very low | | Vinyl / composite | $5,000 – $12,000 | 25 – 35 yrs | Wash occasionally | | Steel (hard-top gazebo) | $4,000 – $10,000 | 15 – 25 yrs | Occasional rust check | ## Pergola vs. Gazebo: Which one to choose? Now you have a good idea of the detailed differences between pergola and gazebo and the choice totally depends on you. But to make it simple, if you are **looking for a lightweight structure to provide shade and privacy**, then go for **pergola**, it's a good option. Or if you are **looking for a more substantial structure to create a sheltered outdoor living space, then gazebo is a better choice**. ### Pergola vs Gazebo: Which Should You Choose? | Your Goal | Better Choice | Why | |---|---|---| | Full rain/sun protection | Gazebo | Solid roof | | Budget-friendly shade | Pergola | Lower material & labour cost | | Define a walkway/garden path | Pergola | Linear, open design | | Outdoor dining year-round | Gazebo | Enclosed, weatherproof | | Grow climbing plants/vines | Pergola | Open slats support growth | | Cover a hot tub | Gazebo | Privacy + overhead cover | | Modern minimalist look | Pergola | Clean horizontal lines | | Traditional garden centrepiece | Gazebo | Classic octagonal silhouette | You may also like to explore **[The Ultimate Spring Home Maintenance Checklist](https://urbantasker.com/blog/spring-home-maintenance-checklist-tips)** ## Pergola vs. Gazebo: Which is better? In the pergola vs. gazebo debate, the choice ultimately depends on your specific needs, preferences, and the intended use of the outdoor structure. Just read each detail and functionality thoroughly and then decide which one is best for you. Choosing between a Pergola and a Gazebo? It depends on your style and needs. Pergola for open elegance, gazebo for sheltered charm, what's your pick? Both elevate your outdoor space beautifully. Ready to decide? Dive into the options, visualize your perfect retreat, and make your outdoor dreams come true!

Made with in Canada
© 2026, UrbanTasker Technologies Inc. All rights reserved.

When you visit or interact with our sites, services or tools, we or our authorised service providers may use cookies for storing information to help provide you with a better, faster and safer experience and for marketing purposes.